Occupancy Report
The Occupancy Report describes how many people were in one or more monitored areas during one or more discrete time periods. The report relies on SAFR's direction of travel feature, so the camera(s) that the Occupancy Report uses should be positioned such that people are either moving directly away, directly. towards, directly to the left, or directly to the right of the camera. See the Desktop Client Camera Preferences documentation for additional information about the direction of travel feature.
In addition, the following preferences must be set for the report to work:
- Every participating camera must be using a Operator Mode that can generate events.
- Events must be enabled in the Desktop Client's Events Preferences menu.
- Face detection and person detection must be enabled in the Desktop Client's Detection Preferences menu. If person detection isn't enabled, then anybody whose face can't be seen (e.g. only the back of their head is visible) won't be counted.
Input Parameters

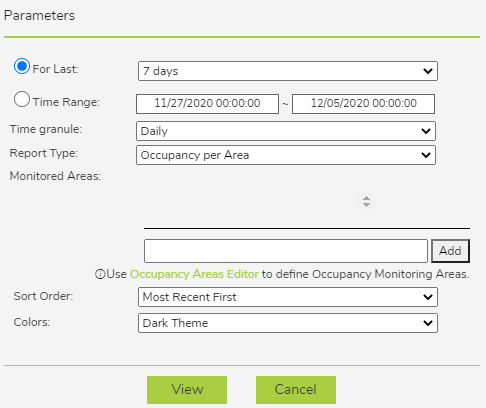
- For Last: Number of previous days to include in the report. There are 5 possible values: 24 hours, 7 days, 30 days, 90 days, and 365 days. If you want the report to cover a time period other than these 5 values, use the Time Range parameter instead.
- Time Range: The dates to include in the report. Use this parameter if you want a custom time range that isn't available in the For Last parameter.
- Time granule: Specifies how much time each row of the report covers. There are 4 possible values: Hourly, Daily, Weekly, and Monthly.
- Report Type: Specifies the type of report to generate. There are 2 types of reports available:
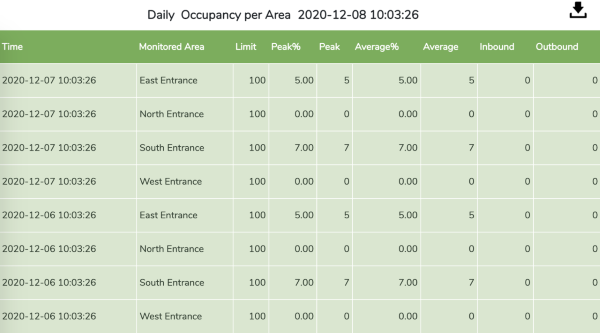
- Occupancy per Area: Each row of the report represents a single occupancy monitoring area.
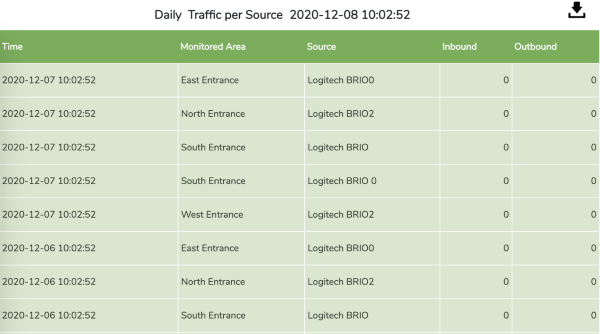
- Traffic per Source: Each row of the report represents a single camera
- Monitored Areas: Specifies the occupancy monitoring areas to be included in the report. You'll need to define one or more areas by using the Occupancy Areas Editor on the Web Console's Reports Page.
- Sort Order: Specifies the criteria by which the report rows are ordered. There are 2 options: Most Recent First and Oldest First.
- Colors: Specifies which color scheme will be used for the report. There are two options: Dark Theme and Light Theme.
Generated Report
You can download the generated Occupancy Report as an *.xslx file by clicking on the download symbol in the upper right corner.
Occupancy Per Area Report
Below is a sample "Occupancy per Area" Occupancy Report. Entries where the occupancy levels reached yellow or red alert levels will be highlighted in the appropriate color.

Traffic per Source Report
Below is a sample "Traffic per Source" Occupancy Report, where each row of the report represents a single video feed. Note that overall occupancy isn't a meaningful concept when looking at single cameras; instead the report only shows the number of people that traveled into or out of the occupany monitoring area.
