Processing Video Files
- Process Files with the Video Feeds Window
- Process Files with the Command Line
- Batch Processing Files with the Command Line
- Reference
- See Also
Both the Video Feeds Window (located in the Desktop Client and the Web Console) and the Command Line Interface can be used to process video files for person detection and/or recognition. This can be useful to recognize faces for purposes of identifying people or generating events on pre-recorded videos. For example, consider the scenario where you have video footage from cameras throughout a facility and you want to determine where and when a person of interest appears in those videos. To do this, you would register the people of interest to the Person Directory (if they weren't already registered) and you could then process the videos in Enrolled Monitoring video processing mode in order to identify when and where that individual appears.
The Video Feeds Window is the best video file processing option when you only have 1 video to process. When you want to process 2 or more video files, the Command Line Interface is the better choice.
The following videos demonstrate how to process videos.
Note When you switch control from the Video Feeds Window to the Command Line Interface, any feeds that you configured in the Video Feeds Window will be stopped and will not be visible from the Command Line Interface. The feeds still exist in the Video Feeds Window, but you cannot start or manage those feeds from the Command Line Interface. You must re-create new feeds for the Command Line Interface.
Process Files with the Video Feeds Window
To process video files, the Video Feeds Window must have access to those files on the local file system. The window can work with files on an internal hard drive, an external drive attached to the machine, or a network share mounted to the file system. In this example we will use the following directories.
mkdir -p /files/videos
mkdir -p /files/feeds- The
videosdirectory will be used to store the video files that VIRGO will process. - The
feedsdirectory will be used to store feed configuration files used by VIRGO. Feed configuration files store information necessary to process video from a file or camera. videosandfeedscan be either aliases or directories mounted to an external file system.
Mount Host Filesystem to VIRGO Container
In order to process files that are on a Linux machine, you must mount a file system on the host drive to the Docker container running Video Recognition Gateway (VIRGO).
You can mount a host drive onto the Docker instance by doing the following:
Add the following lines to the end of the file "/opt/RealNetworks/SAFR/virgo/app/docker-compose.yml"
vi /opt/RealNetworks/SAFR/virgo/app/docker-compose.yml

- /files:/files
The hyphen should be included.
The resulting file should look something like this. (DON'T USE THE EXAMPLE BELOW - Your system will have different version info.)version: "3.6" services: virgo: image: safr_virgo:1.2.22 container_name: safr_virgo restart: on-failure pid: "host" volumes: - /opt/RealNetworks/SAFR/virgo/config/:/etc/virgo - /files:/files- The mount format is
<path on host>:<path on VIRGO Docker container>- This is equivalent to creating an alias on the Docker container pointing to a actual directory on the host.
<path on VIRGO Docker container>can be any path. It should not exist already.<path on host>should be a real directory. It can be located anywhere on the host drive.- Using the same path for both makes it less confusing when typing filepaths because there will be no need to remember the Docker path and to append the relative host path. Just use the fully qualified host path when defining the location of a video in the VIRGO config.
- The mount format is
Run the following commands to re-mount all paths on the Docker container:
docker-compose -f /opt/RealNetworks/SAFR/virgo/app/docker-compose.yml down
docker-compose -f /opt/RealNetworks/SAFR/virgo/app/docker-compose.yml up -d
Check to see if the folder is mounted correctly in the Docker container by doing the following:
Run the following command to sign into the Docker container:
docker exec -it safr_virgo bashTry to list the directory of the location mounted above:
ls /filesYou should see the two folders (feeds and videos) that you created listed under this location.
Use the Video Feeds Window
To use the Video Feeds Window, do the following:
- Connect to the Web Console or open the Desktop Client. See here for details about the Web Console and how to connect to it.
- Navigate to the Video Feeds tab and select Processor Status. Assuming you have no other video clients connected to the server (i.e. from additional connected VIRGO feeds or Desktop Clients), you will see a single entry representing VIRGO with no feeds.
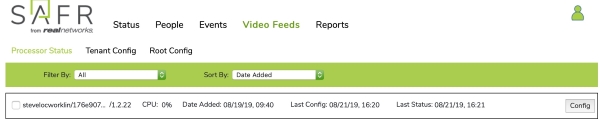
- Click Config to add feeds.
- Enter values for the following fields:
- name - User-defined name. We recommended that you only use ASCII letters and numbers (i.e. no spaces) since this is used to reference the feed on the command line.
- mode - Defines the default settings for SAFR detection and recognition.
- input.stream.url - Source camera URL or filename of the video to use as input. In this case we pre-pend the value with "file://" to indicate that we're processing a file. The path portion is the path to the video file relative to the Docker container, as explained above.
- In the screenshot below, the
enabledfield still has its default value of "false". You should set it to "true" when you are ready to start processing the file.

- Before clicking Apply, add an additional field to specify the start time of the video. Do this by doing the following:
- Click Add Attributes under the feed.
- Search for and select the "reporter.events-initial-date-offset" property.
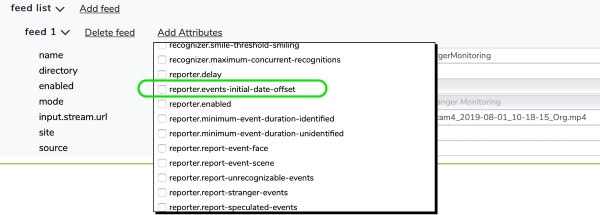
- Once added set a date value as Epoch in milliseconds. For example, for Aug 1, 2019 at 11 AM, the Epoch value is 1564682400000.
- This causes generated events to be recorded at the correct point in time rather than being recorded at the default Epoch value of "0" or January 1, 1970.
- Try the Chrome Extension ‘utime' to create Epoch times. This extension allows you to type any date/time and get Epoch values as well as natural language strings such as ‘1 hour ago'.
Note: Be sure to set the time format to "milliseconds" or else the time will be off by many years.
- Change the
enabledfield to "true" and click Apply to save the feed and start processing the video. - If all goes well you should see the following:

- For a few moments you may see the
Last Configdate in red which means that changes have not yet been applied to VIRGO. Once the changes have been applied, VIRGO should start processing and you should see theStatusreported as "ok". You can click View to see the current frame of video being processed. This will be updated every second or so. - See Troubleshoot Feeds below if the video does not start processing successfully.
- You can move to the Events tab to view the events being processed. You may need to change the search criteria to include August 1, 2019 for the events to show up.
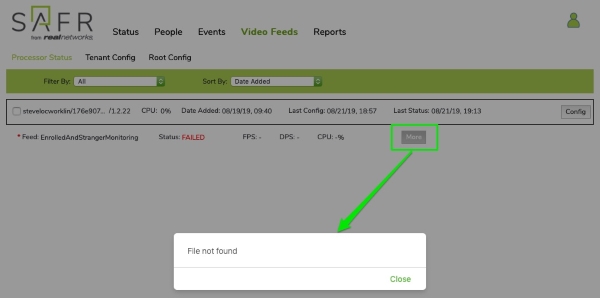
Troubleshoot Feeds
If there is a problem, first check the More button on the VIRGO feed as shown below:
Additional possible troubleshooting steps:
- If you see status as "inactive", check the enabled option in the queue file. It should be "true", as in:
"enabled" : true - To start the feed, you can run the VIRGO command:
docker exec -it safr_virgo ./virgo feed start queue1 - To avoid this problem with subsequent files, you may want to edit the feed configuration file to set
enabledto "true".
If the steps above do not fix the problem, then it may help to look at the service monitor or service log. Both must be started before running VIRGO in order to capture the error output.
View the VIRGO Service Monitor
To view the service monitor, log into SAFR Server and run the following command:
sudo docker exec -it safr_virgo /opt/RealNetworks/virgo/virgo service monitor

or

docker exec -it safr_virgo bash
./virgo service monitor
You should see the following:

View the VIRGO Service Log
To view the service log, run the following command:
sudo docker exec -it safr_virgo /opt/RealNetworks/virgo/virgo service log d/feed d/http-cop

or

docker exec -it safr_virgo bash
virgo service log d/feed d/http-cop
With the above running, restart the feed. In the Video Feeds Window you may need to do the following to successfully restart the feed:
- Set the feed
enabledflag to "false". - Save.
- Change the
enabledflag back to "true".
Additional Notes:
- Information will be printed to the screen. Use Unix Redirect (>) or "tee -a" command to write output to file.
- Additional options for VIRGO logging can be found here.
- It is useful to have both the service monitor and service log open in separate windows as you start the video feed.
Process Files with the Command Line Interface
Create a Feed Template
To run VIRGO, you need a feed configuration file. You can use the configuration file we created above in VIRGA as a starting point. This will include most of the common configuration properties needed.
Export a feed configuration file from VIRGO to use as a template.
Get a list of VIRGO feeds.
> sudo docker exec -it safr_virgo ./virgo feed list EnrolledAndStrangerMonitoring- EnrolledAndStrangerMonitoring should be the only feed listed.
Save that configuration to a file called template.json.
> sudo docker exec -it safr_virgo ./virgo feed get EnrolledAndStrangerMonitoring /files/feeds/template.json- The folder /files/feeds here is relative to the VIRGO Docker container. This path is mounted to the same path (/files/feeds) on the host filesystem.
Ensure that the file was written.
> cd /files/feeds
> ls

template.json
Edit the file ‘template.json' if desired. Generally it's easier to perform editing in the Video Feeds Window before exporting.
- The Video Feeds Window unnecessarily adds extra escapes to forward slashes in the JSON. This makes the string much harder to read. When using the Video Feeds Window to generate configuration files, the file path string can be simplified as follows:
- Change this:
file:\/\/\/opt\/RealNetworks\/virgo\/files\/videos\/cam4Aug1_output000.mp4 - To this:
file:///opt/RealNetworks/virgo/files/videos/cam4Aug1_output000.mp4
- Change this:
- The Video Feeds Window unnecessarily adds extra escapes to forward slashes in the JSON. This makes the string much harder to read. When using the Video Feeds Window to generate configuration files, the file path string can be simplified as follows:
Create a copy of the template file and name it ‘queue1.json'. You're making a copy because you'll maintain one file for each feed.
> cd /files/feeds
> cp template.json queue1.json
Update the feed file by setting values for site, source, start time, and filename. Use the utility script update_virgo_feed.sh documented below for this purpose.
> update_virgo_feed.sh queue1.json Site01 Camera10 1564682400000 'file:///files/videos/test/vid00.mp4'- See the script's documentation below for a description of its command line arguments.
- The file path assumes you have mounted the VIRGO Docker container to /files in the host drive as explained above.
This will set the values for the respective fields in queue1.json. View the file in an editor to confirm edits were made.
Create Feed
You can assign the feed configuration file created in the previous section to a feed. Before doing that, you need to first switch control from the Video Feeds Window to the Command Line Interface. As explained above, the Video Feeds Window and the Command Line Interface do not share the same configuration files. That is why you first exported a configuration file above from the Video Feeds Window. Now that you have a configuration file, you're ready to switch control to the Command Line Interface. The Command Line Interface will start out with no feeds defined. You will then create feeds from the configuration file saved above.
Switch control from the Video Feeds Window to the Command Line Interface
> sudo docker exec -it safr_virgo ./virgo administrator set virgoNote: This changes control of VIRGO from the Video Feeds Window to the Command Line Interface. The Video Feeds Window will no longer be able to start or stop VIRGO feeds until control is restored back to it. Note that all feeds added to the Video Feeds Window are not available to the Command Line Interface. You will re-create feeds as described below.
Create a new feed ‘queue1' from the queue1.json feed configuration file created above.
> sudo docker exec -it safr_virgo ./virgo feed add queue1 /files/feeds/queue1.jsonConfirm that the feed was added to VIRGO.
> sudo docker exec -it safr_virgo ./virgo feed list

queue1
VIRGO will attempt to start processing the feed right away. Run VIRGO Service Status or VIRGO Service Monitor/
> sudo docker exec -it safr_virgo ./virgo service status

queue1 ok
See the Service Monitor section above for information on how to run VIRGO Service Monitor. Initially you may see a status reported as "prerolling" which means the feed is starting up.
After processing is done, the status should change from "ok" to "eos" (meaning End of Stream). If any other status is shown, see Troubleshoot Feeds above.
Edit Feed and Reload
To edit a feed and re-load, do the following.
Stop the feed with following command:
docker exec -it safr_virgo ./virgo feed stop queue1Edit the file and correct problems. Re-load the file from disk using following command:
docker exec -it safr_virgo ./virgo feed set queue1 /files/feeds/queue1.jsonRestart the feed with following command:
docker exec -it safr_virgo ./virgo feed start queue1
Batch Processing Files with the Command Line
When batch processing multiple files, it's most efficient to process two or more files in parallel. The optimal number of parallel processes is a function of processor speed and disk/network speeds and should be determined by experimentation on your hardware. VIRGO will try to process files as fast as possible and leverage multiple CPU cores and GPUs but there is generally a limit to how many CPU cores it uses. Processing more files in parallel will allow you to fully utilize the machine resources.
In general the process is as follows:
- N queues are created. Each queue will be able to process 1 file in parallel.
- 1 file is set to be processed on each queue.
- Each of the queues is started. (As long as enabled=true is set, processing will start as soon as the feed file is assigned to the queue.)
- As each queue is started, its status will be "ok".
- As each queue completes, the status will change to ‘eos'.
- Any feed with status ‘eos' is assigned the next file in line to be processed.
- Files continue to be added to queues until all files are processed.
Create Feed Queues
In order to create a feed queue, create an additional feed called queue2.
> cp template.json queue2.json
> update_virgo_feed.sh queue2.json Site06 Camera04 'file:///files/videos/test/vid01.mp4'
> sudo docker exec -it safr_virgo ./virgo feed add queue2 /files/feeds/queue2.json
You'll maintain different queue files (queue1.json and queue2.json) in order to allow queue1 and queue2 to be processed independently. Each queue file serves as a record of what is running on the current queue. If an error occurs on one of the queues, you can use the get_input_stream.sh script to identify the file that was not processed for the queue and write it to an error log file.
The 2nd feed should start automatically. If you check the VIRGO Service Monitor, you should see something like the following:
Status      Feed          Epoch     P-Time        Resolution  FPS  DPS  dDt     dRt     #D
eos         queue1        04:45:50  00:00:04.343  1920x1080   -    -    -       -       816
ok          queue2        06:28:36  00:00:04.413  1920x1080   -    -    -       -       819
Create Feed File List
The feed file list is a CSV file with following columns:
- Video File Relative Path - The path of the video file. It is relative to the base path set in the process_files.sh script.
- Site - Specifies site (building, GPS location, etc) name for the purpose of identifying location.
- Source - Specifies the camera name for purposes of identifying location.
- Date - Internal use only.
- EpochDate - Start time of the video file in Unix Epoch date format. This is used to ensure events are created at the proper point in the timeline.
- This value must be in Epoch milliseconds.
- See the Process Video Files Script section below for information on creating Epoch values using the process_files.sh script.
- Epoch millisecond values can be created from human readable dates in Excel using this formula: =(D1-DATE(1970,1,1))864001000
- Where "D1" is the cell containing the start date of the video.
Below is an example of the contents of the feed file list file:
vid001.mp4,Site05,Camera025,8/20/19 7:12 AM,1566285120000
vid002.mp4,Site03,Camera024,8/20/19 7:12 AM,1566285120000
xvid003.mp4,Site01,Camera003,8/20/19 4:48 AM,1566276480000
vid004.mp4,Site01,Camera030,8/20/19 12:00 PM,1566302400000
vid005.mp4,Site04,Camera016,8/20/19 12:00 PM,1566302400000
vid006.mp4,Site04,Camera002,8/20/19 7:12 AM,1566285120000
vid007.mp4,Site03,Camera016,8/20/19 12:00 PM,1566302400000
xvid008.mp4,Site02,Camera020,8/20/19 12:00 PM,1566302400000
vid009.mp4,Site05,Camera011,8/20/19 9:36 AM,1566293760000
vid010.mp4,Site02,Camera030,8/20/19 7:12 AM,1566285120000
vid011.mp4,Site05,Camera021,8/20/19 9:36 AM,1566293760000
vid012.mp4,Site04,Camera009,8/20/19 9:36 AM,1566293760000
vid013.mp4,Site01,Camera001,8/20/19 12:00 PM,1566302400000
vid014.mp4,Site02,Camera017,8/20/19 9:36 AM,1566293760000
vid015.mp4,Site04,Camera014,8/20/19 12:00 PM,1566302400000
vid016.mp4,Site02,Camera010,8/20/19 7:12 AM,1566285120000
vid017.mp4,Site04,Camera030,8/20/19 7:12 AM,1566285120000
vid018.mp4,Site02,Camera022,8/20/19 9:36 AM,1566293760000
vid019.mp4,Site05,Camera006,8/20/19 4:48 AM,1566276480000
vid020.mp4,Site02,Camera012,8/20/19 9:36 AM,1566293760000
vid021.mp4,Site02,Camera005,8/20/19 7:12 AM,1566285120000
xvid022.mp4,Site01,Camera019,8/20/19 4:48 AM,1566276480000
xvid023.mp4,Site02,Camera016,8/20/19 7:12 AM,1566285120000
vid024.mp4,Site04,Camera027,8/20/19 7:12 AM,1566285120000
Edit the Process Files Script
Edit the configurable parameters in the process_files.sh script. Below are the default values in the script.
## USER CONFIGURABLE PARAMETERS ##
##################################
# User Directory
user_dir=main1
# Set this to the location of the feed configuraiton files.
feeds_dir=/files/feeds
# If different than above, Set to the path to feeds from inside docker container
docker_feeds_dir=$feeds_dir
# Set this to location of the video files
video_files_dir=/files/videos/1min_segments
###################################- user_dir is the user directory where identities and events are stored. It can be useful to edit this parameter when experimenting with different settings.
- The default values for feeds_dir and docker_feeds_dir are the same because of the most common ways that host file systems are mounted in the docker container. This may not necessarily be the case so the two attribute are separated in the script
- The script assumes video_files path is identical in the host as well as the docker container. Script would need to be modified if this was not the case (one part of the script checks the existence of the file from the host OS while in another place, the path to the video file is passed to VIRGO running in the docker container via the feed configuration file
Reference
This section includes reference files and example scripts useful in processing video files with the Command Line Interface.
VIRGO Command Line Help
Command line interface to the virgo daemon
Syntax:

'virgo' followed by one of the following:

administrator set <administrator>         sets the administrator. Either 'virgo' or 'virga'
administrator get                         shows the current administrator

environment get                           shows the current environment
environment set <environment>             sets the current environment
environment list                          shows all supported environments

feed list                                 shows all known feeds
feed get <feed> [path]                    shows the feed configuration and optionally saves it as a feed configuration file
feed status <feed>                        shows the current feed status
feed start <feed>                         marks the feed as enabled and starts it running
feed stop <feed>                          stops the feed and marks it as disabled
feed remove <feed>                        stops the feed and removes it
feed add <feed> <path to config>          reads the feed configuration file and adds the new feed to the known feeds
feed set <feed> <path to config>          reads the feed configuration file and updates the feed with the new configuration
feed capture-image <feed> <url or path>   captures one or more images from the feed and stores them in the directory <url>

service info                              shows the service information
service status                            shows the current status of all feeds
service reset                             resets the persistent virgo state back to the factory defaults
service log                               continuously shows the current service log information
service monitor                           continuously shows the current service status and statistical information
service update <version> [<url or path>]  upgrades or downgrades virgo to the specified version
service versions                          shows all installed versions

user get                                  shows the current user cloud identity
user set [user id]                        sets the current user cloud identity

<environment> is an environment name.
<feed> is a feed name.
<version> is a semantic version number (e.g. 1.0.3).

--help | -h     shows this help message.
--verbose | -v  enables the display of more detailed information.

--max-frames    the maximum number of frames to capture from a feed
--frame-delay   the delay between capturing frames. This is in milliseconds
--size          the size to which a captured image should be scaled
Process Video Files Script
process_files.sh
This is the primary commands that loops through all files and adds them to VIRGO queues for processing.
#!/bin/bash
script_dir=$(dirname "$0")

## USER CONFIGURABLE PARAMETERS ##
##################################
# Set this to the location of the feed configuraiton files.
feeds_dir=/files/feeds
# If different than above, Set to the path to feeds from inside docker container
docker_feeds_dir=$feeds_dir
# Set this to location of the video files
video_files_dir=/files/videos/1min_segments
# User Directory
user_dir=main1
###################################

# Make sure we got correct number of args.
if [ "$#" -lt 1 ]; then
    echo "Usage: $0 <job list file>
    Where <job list file> csv file with video_file,site,source";exit;
fi
# Check if video file list exists
[ ! -f $1 ] && { echo "$1 video list file not found"; exit 99; };

### Loop thru each line in input file
#########################################
OLDIFS=$IFS; IFS=,
cat $1 | tr -d '\r' | while read fname site source date epoch; do
  echo "Placing file $fname for site: $site, source: $source and time: $epoch"
  [ ! -f "$video_files_dir/$fname" ] && {
     echo "$video_files_dir/$fname not found. Skipping" | tee -a error.log; continue;
  }

  ### Loop Feeds - Outer loop
  ##  Get list of queues and pass this into inner loop
  ### Break once inner loop exits with successful assignment
  ############################################################################
  assigned=false; echo "processing file $fname"
  while true; do

    ### Loop Feeds - Inner loop
    ### Loop thru each queue - check to see if any are ready for next job ###
    ############################################################################
    while read feed_line; do
    TEMP=$IFS; IFS=': ' read queue_id queue_status <<< $feed_line; IFS=$TEMP

      if [ "$queue_status" == "failed" ]; then
        # Something went wrong.  Log file being processed by this queue to look at later
        echo $($script_dir/get_input_stream.sh $queue_id.json) >> error.log
      fi
      if [ "$queue_status" == "ok" ] || [ "$queue_status" == "prerolling" ]; then
        # Skip and go to next feed
        echo "Skipping queue $queue_id with status $queue_status"
      elif [ "$queue_status" == "eos" ] || [ "$queue_status" == "inactive" ]; then
        $script_dir/update_virgo_feed.sh $feeds_dir/$queue_id.json $site $source $epoch "file://$video_files_dir/$fname"
        $script_dir/set_virgo_feed_attr.sh $feeds_dir/$queue_id.json directory  $user_dir
        echo "Set file $fname on queue $queue_id" | tee -a processed.log;
        docker exec safr_virgo ./virgo feed set $queue_id $feeds_dir/$queue_id.json
        if [ "$queue_status" == "inactive" ]; then
          docker exec safr_virgo ./virgo feed start $queue_id
        fi
        # Skip all other feeds and go to next file
        assigned=true; break 1;
      else
        #  Unexpected processing status. Report in error log
        echo "Unexpected virgo feed status $queue_status"  >> error.log
      fi
    sleep 1
    done <<< "$(docker exec safr_virgo ./virgo service status)"
   if $assigned; then echo "Assigned $fname to $queue_id"; break 1; fi
  done
done
IFS=$OLDIFS
Utility Scripts
The following scripts are used by the processing_files.sh script.
update_virgo_feed.sh
#!/bin/bash
if [ "$#" -lt 4 ]; then
    echo "Usage: $0 <feed filename> <sitename> <sourcename> <starttime> '<file_path>'";exit;
fi
sed -i -e "s|\"site\" *: *\"[^\"]*\"|\"site\" : \"$2\"|g" $1
sed -i -e "s|\"source\" *: *\"[^\"]*\"|\"source\" : \"$3\"|g" $1
sed -i -e "s|\"reporter.events-initial-date-offset\" *: *\"[^\"]*\"|\"reporter.events-initial-date-offset\" : \"$4\"|g" $1
sed -i -e "s|\"input.stream.url\" *: *\"[^\"]*\"|\"input.stream.url\" : \"$5\"|g" $1
Where:
- <feed filename> - Name of the file that contains feed settings.
- <sitename> - Specifies the site (building, GPS location, etc) name for the purpose of identifying the location.
- <sourcename> - Specifies the camera name for the purpose of identifying the location.
- <starttime> - Start time/date of the video. The value given as Epoch in milliseconds. For example, for Aug 1, 2019 at 11 AM, the epoch value is 1564682400000.
- Try the Chrome extension ‘utime' to create epoch times. This extension allows you to type any date/time and get epoch values as well as natural language strings such as ‘1 hour ago'. Be sure to set the time format to "milliseconds" or else the time will be off by many years.
- <file path> - The fully qualified path to the file relative to the Docker container.
set_virgo_feed_attr.sh
#!/bin/bash
if [ "$#" -lt 3 ]; then
    echo "Usage: $0 <feed filename> <attr name> <attr value>";exit;
fi
sed -i -e "s|\"$2\" *: *\"[^\"]*\"|\"$2\" : \"$3\"|g" $1
Where:
- <feed filename> - Name of the file that contains feed settings.
- <attr name> - The JSON attribute name from the feed configuration file.
- <attr value> - The value to be assigned to the JSON attribute from the feed configuration file.
get_input_stream.sh
#!/bin/bash
if [ "$#" -lt 1 ]; then
    echo "Usage: $0 <feed filename>"
fi
grep input.stream.url $1 | sed -e 's:"input.stream.url" *\: *"\([^"]*\)",*:\1:g'
Where:
- <feed filename> - Name of the file that contains feed settings.