VIRGO in the Video Feeds Window
One of the primary ways to manage Video Recognition Gateway (VIRGO) feeds is via the Video Feeds window of the Desktop Client or the Web Console. The sections below describe how to do so.
Create a VIRGO Feed
Newly created VIRGO feeds have the following properties:
- The feed is not affected by subsequent changes to preferences made within the Desktop Client. If you change a preference within your Desktop Client, that change is not cloned to the existing VIRGO video feed(s).
- Feeds continue running and processing their video streams regardless of whether or not the Desktop Client is running or not.
- If you shut down your machine, the video feed will try to restart itself whenever your machine is turned on again.
Camera Feed Analyzer Method
Windows only.
The easiest way to create a VIRGO feed is to do the following:
- Open the Desktop Client.
- Connect a camera to the client in the Camera Feed Analyzer window. (i.e. the default window)
- Press the Add to Video Feeds for continuous processing in the background button as shown below highlighted by the red arrow.

- You'll be prompted for the following information:
- Feed Name: Enter any name for the video feed you wish.
- Mode: Select the operator mode from the drop-down menu that you want the VIRGO daemon to operate in. For a description of the operator modes, see here.
- Processor: The machine where you want the VIRGO feed to run. The current machine is selected by default.
- Apply Mode Customizations from Preferences: Enable if you want the Desktop Client preferences applied to the new VIRGO feed.
Manual Method
The manual way to create a VIRGO feed is as follows:
- Connect a camera to SAFR.
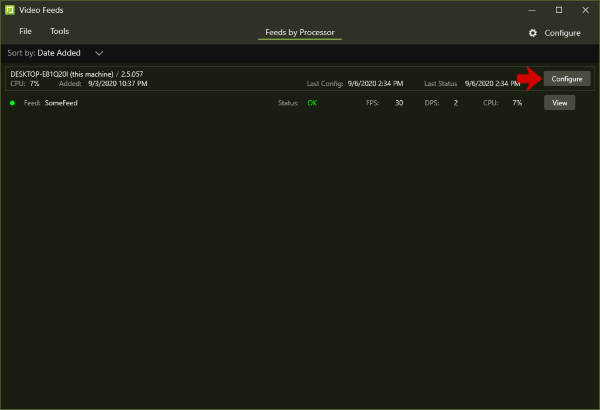
- Open the Video Feeds window and click the Configure button for your current machine.
- Hover your mouse over Feeds, then click the + button.
- You'll be prompted for the following information:
- Feed Name: Enter any name for the video feed you wish.
- Camera: Select the camera feed you connected in Step #2 from the drop-down menu.
- Format: Select the resolution and frame rate for the new video feed.
- Mode: Select the operator mode from the drop-down menu that you want the VIRGO feed to operate in. For a description of the operator modes, see here.
- Apply Mode Customizations from Preferences: Enable if you want the Desktop Client preferences applied to the new VIRGO feed.
- Click the Add button.
- Click Apply in the bottom right corner of the Video Feeds window.
Note: If you close the Video Feeds window without first clicking Apply, the video feed won't be created.
Manage VIRGO Feeds
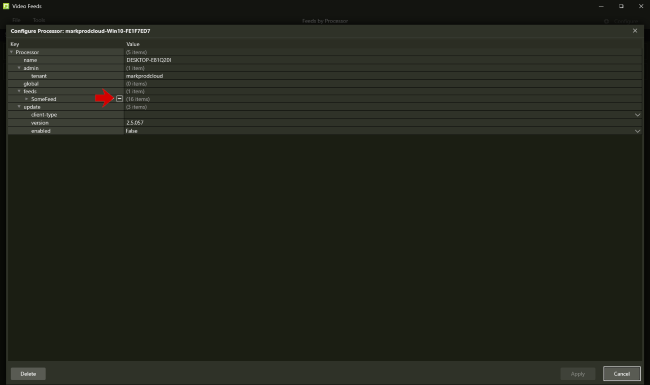
To manage VIRGO feeds, open the Video Feeds Window within either the Desktop Client or the Web Console, then click the Configure button for your current machine. You'll see a screen similar to the following: (Note: You can often expose additional properties by clicking on the arrow next to entries, as shown by the arrow next to the SomeFeed entry below.)
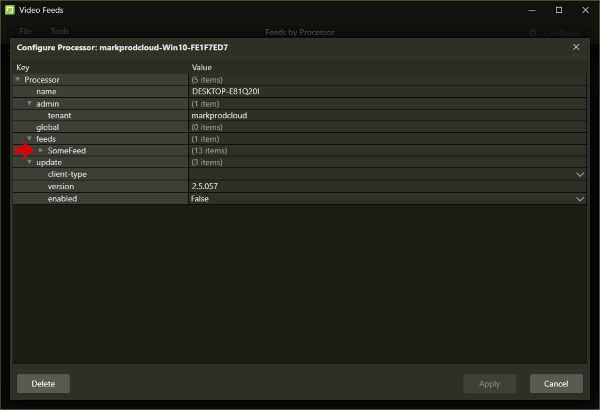
name: The name of the machine being managed.
admin: Contains admin properties.
Property Description resource-type tenant The tenant being managed. global: Contains global properties. See Global Properties for more information.
monitoring: Monitoring properties allow you to monitor a video feed's health and send a notification email if one of the health metrics degrades to a certain level.
To set up notification emails, do the following:- Set up an SMTP Email Service on the Status Page of the Web Console.
- Enable one or more of the alarm conditions of the video feed's monitoring properties. There are 7 conditions available:
- delinquent: The video feed has stopped responding/sending status updates.
- feed.error: The video feed has encountered an error.
- lowRAM: The host machine has low RAM memory.
- lowDisk: The host machine has low hard drive storage space.
- lowGPUMemory: The host machine has low GPU memory.
- lowCPU: The host machine has low CPU processing power.
- lowGPU: The host machine has low GPU processing power.
- Set the subject and message properties for your enabled conditions.
- Set the threshold property for enabled conditions. (Note: The delinquent and feed.error conditions don't have threshold properties),
- Set the alarm.mail.username and alarm.mail.password properties to your email credentials.
- Set alarm.mail.enabled to TRUE to enable the notification emails.
See Monitoring Properties for a list of all the available monitoring properties.
feeds: Specifies the feed properties. See Feeds Properties for more information.
update: The update properties are not intended for public consumption at this time.
Terminate a VIRGO Feed
VIRGO feeds that haven't been terminated will continuously run in the background, and will automatically restart themselves after system shutdowns and reboots. Because each video feed consumes a significant amount of CPU resources, you'll want to terminate video feeds that are no longer of interest to you. Do the following to terminate a video feed:
- Open the Video Feeds Window within either the Desktop Client or the Web Console.
- Click the Configure button.
- When you hover your mouse over name of the feed that you want to terminate, you'll see a + button and a - button. Click the - button.
- Click the Apply button in the bottom right of the window. At this point, the feed will be terminated. Note: If you click the Cancel button, the feed termination is undone and the feed will continue operating.