Retail Analytics Solution Guide
This solution guide describes how to set up traffic monitoring for the purpose of understanding the person count in your facility. It uses cameras in your facility to learn and recognize individuals and analyze and record their age, gender, and sentiment. Because people are being learned, SAFR knows when a subject has moved from one camera to another and can report on total individual counts as well as total number of occurrences either at a grouped or individual level.
This guide is written for Windows users. Linux users can achieve the same functionality, but they need to use the Web Console instead of the Desktop Client.
For simplicity's sake, this guide assumes that you're using a SAFR Cloud License. If you're using a SAFR On-Premises License, you'll also need to install and manage the SAFR Server.
Required Hardware and Software
Required Hardware
- At least one camera for every area you want to monitor. See the Camera Selection section below for information about camera requirements.
- Approximately one PC computer for every 8 cameras that you use. See SAFR System Requirements for recommended computer specifications.
Required Software
- Install SAFR Desktop Client Universal Edition on each PC that you're going to use.
Install SAFR Desktop Client
Download and install the SAFR Desktop installer for Windows from the SAFR Download Portal. The SAFR Desktop installer includes both the SAFR Desktop Client and SAFR Actions, but there's no need to install SAFR Actions for this use case.
To configure your Desktop Client, do the following:
- Open the SAFR Desktop Client.
- Select Preferences… from the Tools drop down menu.
- Click on the Recognition icon at the top of the Preferences menu.
- Set the For Mode setting to Enrolled and Unique Traffic Monitoring.
- Scroll down almost to the bottom of the Recognition menu, to the Detect section.
- Enable the Gender setting. (Age and Sentiment should already be enabled by default.)
Camera Selection
Cameras should be located so that subjects' faces aren't backlit; the faces should be well lit from the front with an even and uniform lighting. Direct sunlight on faces should also be avoided in order to reduce sharp contrast, which often hides facial features.
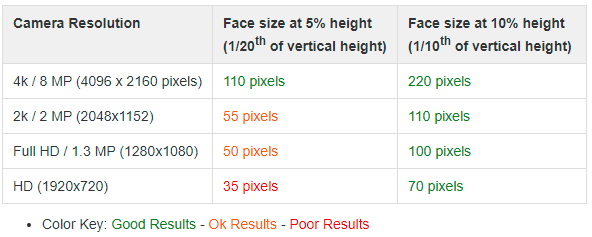
Because a wide field of view is typical in these scenarios, it's important to have as high a resolution as possible. Make sure the camera resolution is sufficiently large so that faces are at least 60 pixels tall. (160 pixels is preferable.) The table below provides face sizes for various camera resolutions. Face sizes can be improved by either using larger cameras or by using camera zoom. If you use camera zoom, only use optical zoom. Using digital zoom will negatively impact recognition because it will degrade the quality of image.

Generally a 4k camera or higher is preferable. The larger the face image size the better the result.
Install and Connect Your Cameras
For each camera you install, do the following:
- Within the SAFR Desktop Client's Camera Feed Analyzer window, select the camera you want to install.
- Select the Enrolled and Unique Traffic Monitoring operator mode from the drop-down menu in the upper right corner of the Camera Feed Analyzer window.
- Optimize the camera location and orientation. Adjust the camera's optical zoom to ensure that subjects' faces are at least 120 pixels high from chin to forehead. (160 pixels would be even better.)
- Adjust the focus of the camera to the closest position where all subjects' faces are within the camera's field of view. (i.e. ensure that no one will be to the left or right of the camera view)
- Add the camera's video feed to your Video Recognition Gateway (VIRGO) video feeds by pressing the Add to Video Feeds button.
- Check your system's CPU and GPU load. If you need to install an additional camera, but doing so would increase your CPU or GPU load to 100% or greater, install an additional instance of the SAFR Desktop Client on a different machine and connect the additional camera to the newly installed Desktop Client. Note that you need to configure every Desktop Client as described in the Install SAFR Desktop Client section above.
Reporting
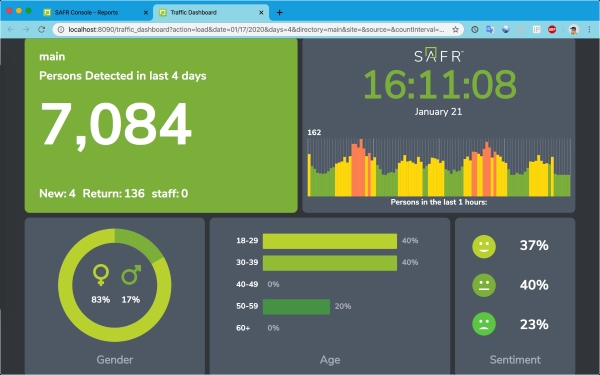
To create a report that summarizes the traffic data gathered over the previous 4 days, do the following:
- Go to the SAFR Web Console, located at https://safr.real.com/console/status.
- Go to the Reports Page by clicking on Reports near the top of the page.
- Click on the first listed report, the Traffic Dashboard.
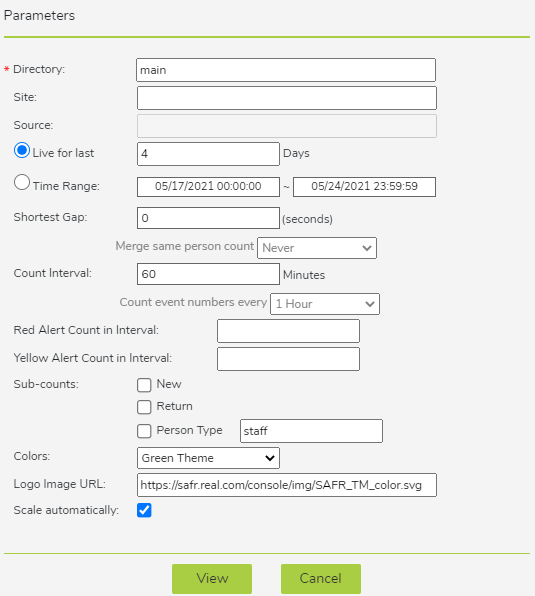
- You'll be prompted to enter the parameters for the report. Disable the 3 Sub-counts options, but accept all the other default parameter values.

- You'll be presented with a dashboard that is automatically updated with the latest data every couple minutes.
