Getting Started with SAFR Platform on Windows or macOS
- SAFR Platform Contents
- Prerequisites
- Download and Install the SAFR Platform
- Check Server Status
- Configure Background Processes
- Connect Desktop Clients
- Next Steps
The computer used for the first installation of SAFR Platform acts as the primary server for the entire SAFR system. The primary server acquires a SAFR license that is then restricted to that machine. (See On-Premises Licensing for details.) Any additional instances of SAFR Server you install under the same SAFR Local Account must be configured as secondary servers for the purposes of load balancing or redundancy and are linked to the primary server as described in SAFR Server Clusters.
SAFR Platform Contents
The Windows SAFR Platform installation includes the following:
- SAFR Server: Includes the recognition engine, event server, several databases, and the Web Console. The databases contain stored enrolled face images, the identity information for the stored faces, and recognition events that have been generated by the SAFR system.
- Desktop Client: One of the primary ways that administrators and operators can interact with the SAFR system. As such, the client can be used to enable camera connectivity, monitor video camera feeds, register users, view recognition events, and more.
- Web Console: Provides web-based access to the SAFR system. As such, the Web Console can be used to generate analytical reports, monitor video camera feeds, register users, view recognition events, and more.
- SAFR Actions: SAFR Actions is a GUI that facilitates configuring SAFRActions.config. SAFRActions.config is the file that defines all the defined actions for your SAFR System, as well as a couple fields that are used to connect ARES (and SAFR Actions) to your primary SAFR Server, whether that server is local or in the cloud. See Actions for more information about actions in SAFR.
- Actions Relay Event Service (ARES): ARES is a cross-platform Java application that acts as the event listener that dispatches configured actions in response to events. ARES can provide replies on any event handled by the client that originates an event and is normally installed as a service when either SAFR Platform or SAFR Desktop are installed. It is constantly active and is automatically started by the operating system on power-up.
- 0 or 1 of the VMS extensions
- Video Recognition Gateway Administration (VIRGO): Receives video feeds from one or more cameras, recognizes and tracks faces in those video streams in real time, generates tracking events, and sends events to an event server.
The macOS SAFR Platform installation includes the following:
- SAFR Server: Includes the recognition engine, event server, several databases, and the Web Console. The databases contain stored enrolled face images, the identity information for the stored faces, and recognition events that have been generated by the SAFR system.
- Desktop Client: One of the primary ways that administrators and operators can interact with the SAFR system. As such, the client can be used to enable camera connectivity, monitor video camera feeds, register users, view recognition events, and more.
- Web Console: Provides web-based access to the SAFR system. As such, the Web Console can be used to generate analytical reports, monitor video camera feeds, register users, view recognition events, and more.
- SAFR Actions: SAFR Actions is a GUI that facilitates configuring SAFRActions.config. SAFRActions.config is the file that defines all the defined actions for your SAFR System, as well as a couple fields that are used to connect ARES (and SAFR Actions) to your primary SAFR Server, whether that server is local or in the cloud. See Actions for more information about actions in SAFR.
- Actions Relay Event Service (ARES): ARES is a cross-platform Java application that acts as the event listener that dispatches configured actions in response to events. ARES can provide replies on any event handled by the client that originates an event and is normally installed as a service when either SAFR Platform or SAFR Desktop are installed. It is constantly active and is automatically started by the operating system on power-up.
- Video Recognition Gateway Administration (VIRGO): Receives video feeds from one or more cameras, recognizes and tracks faces in those video streams in real time, generates tracking events, and sends events to an event server.
Prerequisites
Before you begin the installation, ensure that you have the following prerequisites:
- SAFR Local Account: If you're not sure which account type you have, go to the SAFR Download Portal. If SAFR Platform is listed among the downloads, then you have a SAFR Local Account.
- System requirements: Ensure that your system meets the minimum system requirements listed here.
- An up-to-date SAFR On-Premises License: See On-Premises Licensing for information about SAFR On-Premises Licenses.
Download and Install SAFR Platform
To download and install SAFR Platform using Windows or macOS, do the following:
On the computer where you want to install SAFR Server, open a web browser and go to the SAFR Download Portal.
Sign in with your SAFR Local Account credentials.
Once signed in, select your operating system from the menu and download the appropriate SAFR Platform installer.
After the download is complete, start the installation.
The Platform installer displays a Choose Components window where you can choose the features you want to install, such as:
- SAFR Face Attribute Recognition
- Age
- Gender
- Mask
- Masked Identity
- Occlusion
- Sentiment
- Optimize GPU models
- SAFR Peripheral Sub-systems
- SAFR Actions (If you choose to install SAFR Actions, ARES will automatically also be installed.)
- SAFR Reports
- SAFR Logs
- SAFR Web Console
- SAFR Video Recognition Gateway (VIRGO)
- SAFR Video Recognition Gateway Administrator (VIRGA)
- VMS Extensions
- Camera Extensions
- Intel RealSense
- Ximea
- GPU Support
- NVIDIA Accelerated Recognition
- NVIDIA Accelerated Recognition Preprocessing
- SAFR Application (This refers to the Desktop Client)
You may uncheck the boxes for any features you do not want to install. We recommend installing all the components except the VMS extensions the first time you install SAFR Platform.
In addition to whatever components you selected, SAFR Platform also always installs SAFR Server.- SAFR Face Attribute Recognition
Follow the installer prompts as they guide you through the rest of the installation process. The final phase of the installation may take a few minutes to complete as it installs dependencies and runs the configuration scripts. Allow it to continue without interruption.
On Windows the default SAFR port assignments sometimes conflict with other software port assignments. If a port conflict occurs, the error message shown below will pop up in the middle of your installation.
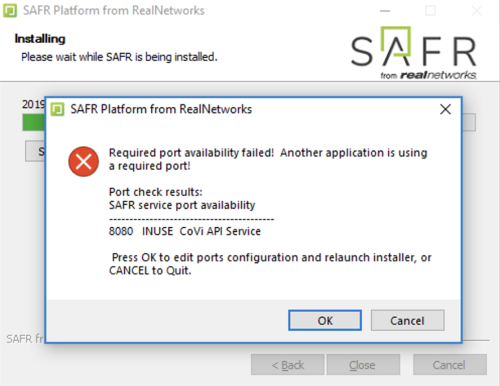
If this happens, do the following:- Click OK to edit port configurations.
- Notepad will open, displaying the safrports.conf file.
- Edit any conflicting ports to new values. (e.g. CoviHTTP=18080)
- Save and exit Notepad.
The Platform installer will then restart and the new port values will be used. You can find the modified safrports.conf file atC:\Program Files\RealNetworks\SAFR\.
After the installation finishes, three icons will appear on your desktop:
SAFR: Launches the Desktop Client.SAFR Actions: Launches SAFR Actions.SAFR Admin Console: Launches the Web Console.
On Windows, SAFR is installed as a SYSTEM user. SAFR Server runs as a collection of Windows services and will start at machine boot time. Permissions are set such that any administrator account can administer the server, including such actions as changing configuration files, viewing log files, and running scripts.
Immediately following installation, the Platform installer opens the Desktop Client and prompts you to log in with your SAFR Local Account. Make sure to log in; it's important in acquiring the SAFR license.
Note: Windows SAFR versions earlier than 3.1 are only compatible with NVidia driver versions 418.96 to 431.86.
Check Server Status
To check the status of your SAFR Server, use the check script. See the table below for the location of the script.
| Platform | Script Name | File Location |
|---|---|---|
| Windows | check.bat | C:\Program Files\RealNetworks\SAFR\bin |
| macOS | check.sh | /Library/RealNetworks/SAFR/bin |
The check script displays the status of all SAFR services. The following screenshot shows a server installation with healthy statuses for all its services:

Configure Background Processes
Sometimes long-running background processes that index or scan your hard drive (e.g., antivirus software) can cause your system to slow down or become unresponsive. If allowed to persist, this may result in system instability due to an accumulation of memory in writing images when large event volumes are experienced. Long write times can be confirmed by looking for write times greater than 500 milliseconds in the cv-object-storage.log file, located here:
- On Windows:
C:\ProgramData\RealNetworks\SAFR\cv-storage\cv-object-storage.log - On macOS:
/opt/RealNetworks/SAFR/cv-storage/cv-object-storage.log
This issue can be resolved by either disabling the problematic background process or by configuring the process to ignore files located in the cv-storage folder, by default located here:
- On Windows:
C:\ProgramData\RealNetworks\SAFR\cv-storage - On macOS:
/opt/RealNetworks/SAFR/cv-storage
On Windows this issue can also be caused by the Windows Search Service. If the Windows Search Service is being problematic, then you should exclude the cv-storage folder from the search by doing the following:
- Right click on the Windows Start menu.
- Search for Windows Search Settings.
- Click on Add an excluded folder.
- Select the cv-storage folder.
Connect Desktop Clients
A Desktop Client that is installed on the same machine as the primary server is automatically connected with your primary server; no additional actions need to be taken.
Desktop Clients that are installed on machines other than the primary server, however, need to be configured so they can connect with the primary server. Clients that aren't connected to a server are nearly useless and have very limited functionality.
To connect a remote Desktop Client, do the following:
- On the remote machine download and install SAFR Desktop for your OS from the SAFR Download Portal.
- Start the Desktop Client. If prompted, cancel the camera login screen. Also cancel the SAFR Account login if it is displayed.
- Click Tools > Preferences. On the Account tab, enter your user identifier and password for your SAFR Local Account.
- Select SAFR Custom from the drop down menu of the Environment setting. Do one of the following:
Note: If you customized ports when installing SAFR Server, use the customized port values instead of the values listed below.- If you are running the server without an SSL certificate, enter the following in the associated fields, substituting the server IP Address for localhost:
- CoVi Server: http://localhost:8080
- Event Server: http://localhost:8082
- Object Server: http://localhost:8086
- VIRGA Server: http://localhost:8084
- If you are running the server with an SSL certificate, enter the following in the associated fields, substituting your server's hostname for localhost:
- CoVi Server: https://localhost:8081
- Event Server: https://localhost:8083
- Object Server: https://localhost:8087
- VIRGA Server: https://localhost:8085
- If you are running the server without an SSL certificate, enter the following in the associated fields, substituting the server IP Address for localhost:
- Click OK to save the preference changes.
Next Steps
Great! Now that you've installed the SAFR Platform, you're ready to explore SAFR's features. We recommend that you do the following:
- Connect a Camera - If you have an integrated camera or a USB camera, this should happen automatically. If you don't have either camera type, or if you would like more information about camera connections, see Connect Cameras to SAFR.
- Importing and Registering People - The instructions in the first section, "Register People Using a Camera Connected to the Desktop Client", will tell you how to start adding faces to the Person Directory.
- You're now able to watch as SAFR analyzes the camera's video feed and recognizes faces in real time. See Interpret Video Feed Overlays for details about the information that SAFR is showing you in the client's camera window.