3 Genetec Configuration
3.1 WEB SDK ROLE AND AUTHENTICATION
The script requires 1 x GSC-1SDk-RealN-FR license per camera or SCAN devices connected in Genetec. This license should be requested from Genetec local team.
- Open the Genetec Config Tool on the server where Genetec has been installed.
- Go to System > Roles:
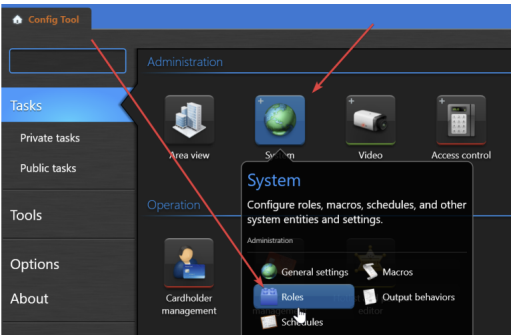
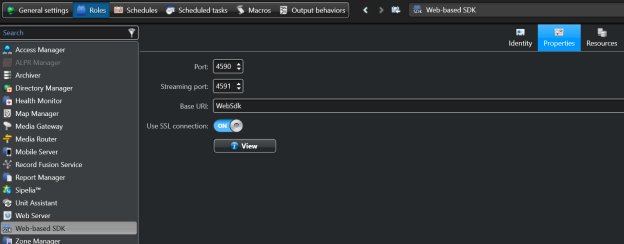
- In order to use the web-based REST API, you must create a "Web-Based SDK" role in Genetec via the Configuration Tool. This will allow you to define the port, streaming port, and the base URI of the integration. Additionally, SSL connection type should be set according to the connection type set on SAFR integration script, which is described on the section 2.2 below.
3.1.1 Create a SAFR User
To create a user with the permissions that SAFR will require, do the following:
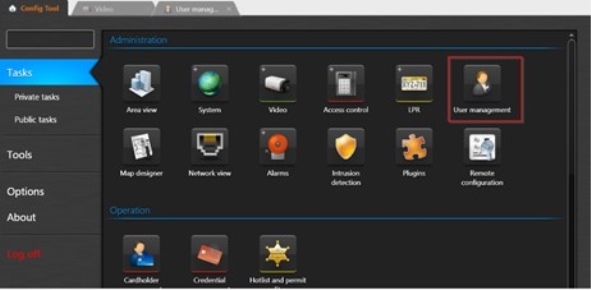
- Open the Genetec Config Tool.
- Click Tasks > User Management.
-
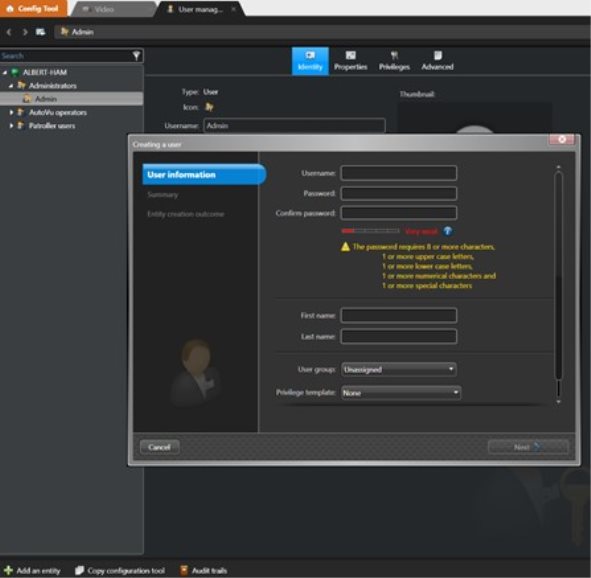
Create a new user (with a username of, for example, SAFR) with the following permissions:
3.1.2 Grant user privileges
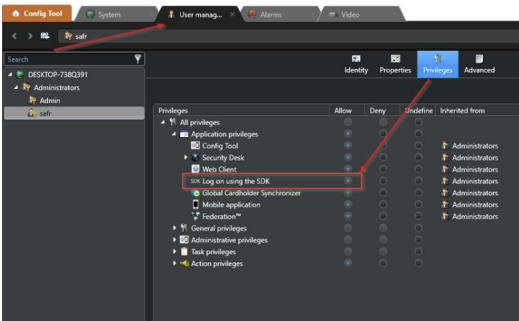
Select new user and go to “Privileges” tab and enable the following under “All privileges
Application privileges
• Log on using the SDK
Administrative privileges
• Physical entities
• View camera properties
Access control management
• View cardholder group properties
• View cardholder properties
• View visitor properties
System management
• View general settings
• Modify custom events
Action Privileges
• Cameras
• View live video
• Add bookmarks
3.1.3 Add Permissions for Event-to-Archive Actions
In order to create Event-to-Actions in the Genetec Config Tool, one or more of the following Action permissions must also be added to the SAFR user created in the previous section. Only those actions you want to trigger with SAFR events are needed:
-
All privileges
-
Action privileges
- Set threat level
-
Cameras
- Protect video from deletion
- Save/modify/print snapshots
-
Access control
-
Doors
- Explicitly unlock doors
- Override unlock schedules
-
Elevators
- Override elevator schedules
-
Doors
-
Alarms
- Trigger alarms
-
Users
- Send a message • Send an email
- Send/clear task
-
Macros
- Execute macros
-
Zones
- Arm/disarm zones
-
Areas
- Modify people count
-
Action privileges
- Once the role is created, define a user for accessing the SDK. Ensure that the user has the role permission.
3.2 Use Self-Signed CERTS
To enable SAFR’s internal trust manager, modify SAFR Configuration and restart SAFR Server as instructed below.
-
Open a text editor with elevated permissions (“Run as administrator”)
💡Notepad++ is a good text editor for Windows and will automatically elevate permissions when needed.
💡On Linux use sudo to elevate permissions with editor of your choice (e.g. “sudo vi genetec.properties”).
-
Open genetec.properties file located in following locations (See section Error! Reference source not found.)
Windows: C:\Program Files\RealNetworks\SAFR\covi\app\config\covi
Linux: /opt/RealNetworks/SAFR/covi/app/config/covi - Edit the following line
genetec.trust.server.certificate:true
Code block line 2
Code block line 3
Note: Apply following process to code blocks so that HTML quote section is single line/no padding after export to HTML:
1. Select all lines except the paragraph mark in last line (i.e. the space after last letter in code block)
2. Use Advanced Find and Replace to replace ^p (paragraph mark) with ^l (Manual line break)
3. When you press “Replace All” Word will only replace selected text (make sure you have selection).
- Set value to true to implicitly trust cert (do not validate) Genetec SSL CERT.
- Save genetec.properties file
- Restart “SAFR Covi” Windows Service in the Windows Services Control Panel (if on Linux, run ‘stop’ and ‘start’ in the SAFR/bin directory).
3.3 Add Cloud Link
3.3.1 Adding Cloud Link Device
Requires IP Address and credentials of Cloudlink device. Confirm you can sign into the Cloudlink device via web browser before proceeding.
Open ConfigTool and add Cloud Link device as follows:
Go to Access control > Roles and units and select item in left hardware tree where Cloud Link will be added.
Enter IP and Credentials.
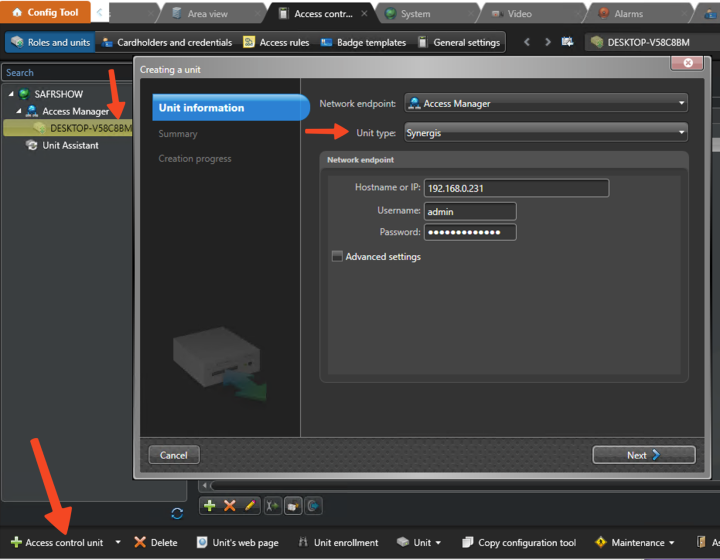
Click "Next" and then "Create".
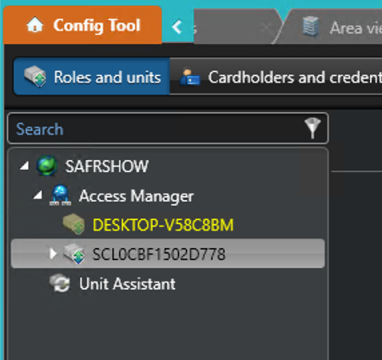
You should see a "Unit created successfully" message at end and a new entry (e.g. SCLOCBF1502D778) in Access Manager is created:
No entries will exist under the new CloudLink device.
Enable RIO on Device
This causes 'RIO" to show up on the Hardware tab and allows adding virtual doors.
Type following URL into browser:
https://192.168.0.231/Features/DuiRIO/Enabled/Set?value=true
Enter username and password in the page form
Click on the link "/Features/DuiRIO/Enabled/Set?value=true" as shown below.
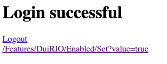
You should then see following page contents confirming property was set:

When done, you should see RIO device appear here:
3.3.2 Add Cloud Llink Device to Genetec
3.3.3 Create Channel and Activate
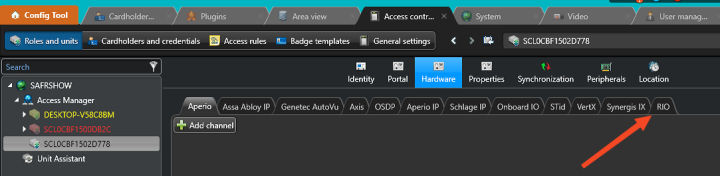
Select the Synergis device in Hardware tree on left
Go to the "Hardware" tab
Select "RIO" tab
Click "Add Channel"
Enter values for Channel, Address and Reader as shown:
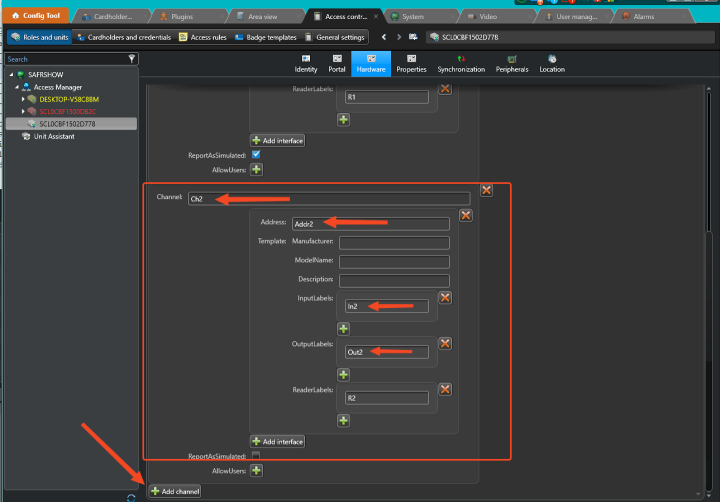
Add channel button to add more channels if needed.
Activate channel by running safr_genetec_relay.exe command as follows:
safr_genetec_relay.exe -activate -c Ch2 -a Addr2 -r R2 -s 10.124.14.156
Create a Door and assign the
From Area view, Add a Door and select the Access control unit just created. For interface module, select the entry that includes the channel an address just created.

Select the Hardware tab for the new Door and set the Reader for In (and Out if desired) and assign a Door Lock.
3.4 Obtain Camera and Door IDs
3.4.1 Obtain Genetec Camera GUID
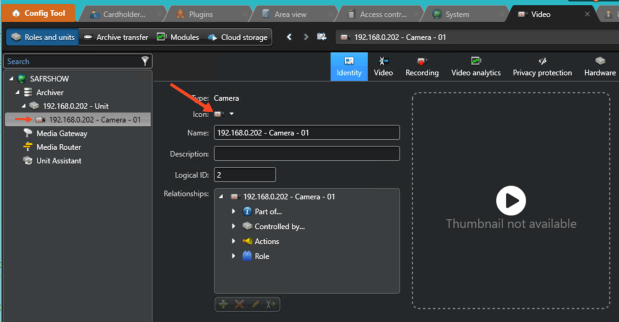
Each Camera in Security Center has a GUID. This GUID is used by the script to tell Security Center which camera the event and bookmark applies to. The GUID can be found though the Security Center Config Tool. Go to the Video task and select the camera. Then hold Ctrl and double mouse click on the icon in Identity tab. This will copy the camera’s GUID into the clipboard.
The camera GUID must be set on the field “input.back-channel.type” from the respective SAFR feed. See Section 3.1 below for how to enter this information in SAFR.
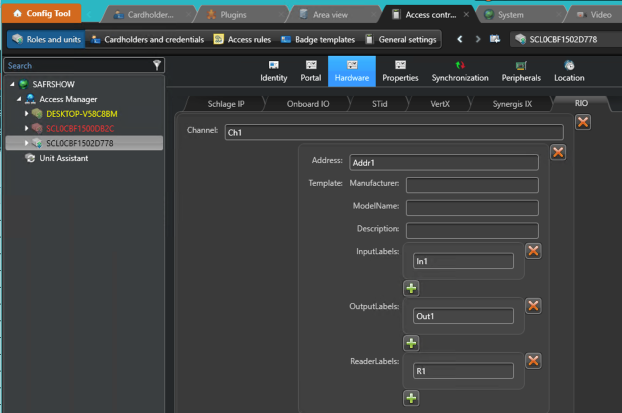
3.4.2 Obtain Genetec Door Channel, Address and Reader
For each door, you will need to collect the channel, address and reader IDs created within the Cloudlink Device in Genetec Config Tool. Screenshot below shows each of these values for a single virtual interface.
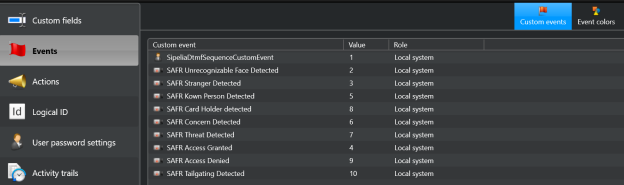
3.5 Genetec Events
Each event in Security Center has a VALUE. This VALUE is used by the script to tell Security Center which SAFR Facial Recognition event applies to Genetec event.
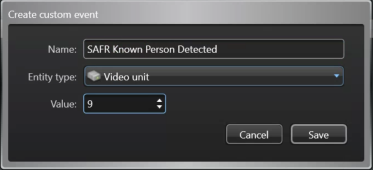
You must define a list of Events to be used in the integration. The events can be created following the steps below.
- On Config Tool, go to System > Events
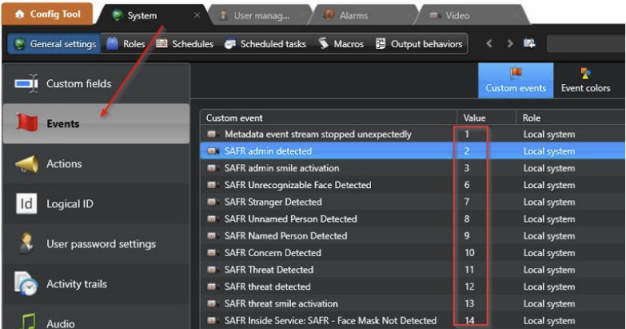
- Create one custom event for each type of SAFR events.
Here is a list of common events generally used in SAFR/Genetec integration
3.6 Genetec Actions
You may define one or more actions that are invoked when a specific Genetec Event is generated by SAFR.=
Select one of the SAFR events under “When”. You can filter by typing “SAFR” and pressing enter (assuming you named the SAFR Events this way)
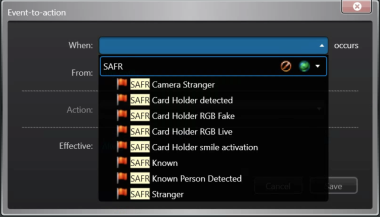
Select remaining options in the Action as desired.
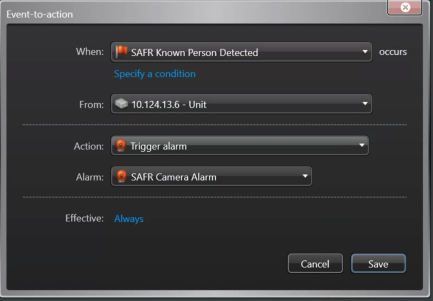
If specifying an Alarm as the action, an Alarm will also need to be defined in the Alarms Task in Config Tool.
3.7 Genetec Access Control
SAFR can facilitate granting access to known cardholders in two ways
- Using SAFR SCAN, SAFR sends card credentials over Wiegand or OSDP to the panel
- Using SAFR Camera or 3rd party cameras, SAFR sends card credentials over IP Network via Genetec Cloudlink
For both options, cardholders should be synchronized to SAFR via SAFR Synergis Integration. See https://docs.real.com/access/integrations/genetec for details.