4 Hardware Setup
4.1 Factory Reset
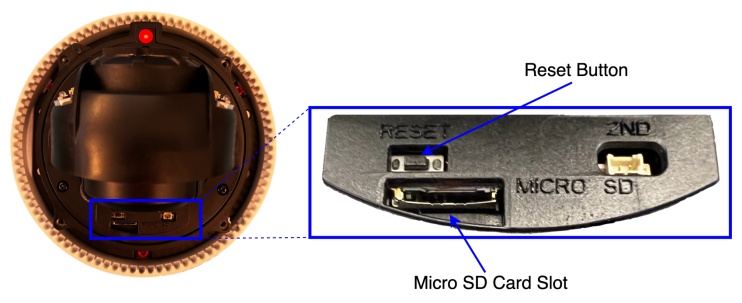
Device can be factory reset from the Camera Web Console (System > Reset) or via Reset button shown below.
4.2 Micro SD Card
A MicroSD Card is used to store video locally. The Micro SD Card is not included and must be purchased separately.
4.2.1 Installing Micro-SD Card
To access the SD Card, the dome cover must be removed. SD Card
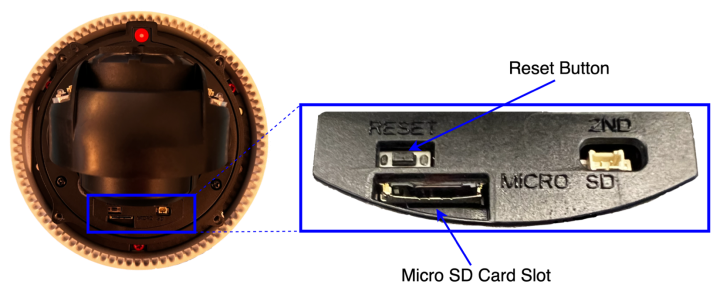
SAFR Cameras support all Micro-SD cards currently on the market up to 2TB (Micro SD, Micro SDHC, Micro SDXC). See SAFR Camera Administration Guide for more details.
4.3 Installing SAFR Camera
See SAFR Camera Installation Guide for information on installing SAFR Camera.

Requirements for installing SAFR Camera outdoors
Failure to follow requirements below may void warranty.
- Avoid surface mounting dome camera directly on an exterior wall - use wall arm mount (SFR-CAM-WALL) or use bullet camera to avoid potential water ingress. Always use a wall arm mount when mounting to porous surfaces.
- Use of waterproof conduit is required for outdoor installations. Conduit should be routed such that it enters the dome or junction box from the bottom – use gravity to avoid water ingress.
- Avoid surface mounting to porous surfaces. Always use a wall arm mount when mounting to porous surfaces.
- Always use the provided silicon grommet over cables entering the camera dome.
- Install supplied desiccant pack inside sealed portion of dome to absorb moisture trapped inside dome. This prevents condensation inside the dome.
- Use drip loops in cabling: Create a downward “drip loop” in the cable near the entry to the building or junction box so water runs off instead of following the cable into connectors.
- Use waterproof junction boxes: Place all outdoor connections (Ethernet, power) inside weatherproof junction boxes with IP66+ ratings. Ensure cables enter through rubber grommets and are sealed with waterproof silicone for extra protection.
- Seal joint between the camera mounting bracket and the camera housing with waterproof silicone.
- Seal all entry points with silicone, duct seal, or feed-through bushings to thoroughly seal any holes where cables enter buildings or enclosures.
4.4 Mounting Accessories
SAFR Camera comes with the following mounting accessories.
|
ACCESSORIES |
|
|
|
|
|
SRF-CAM-WALL |
SRF-CAM-CAP |
SRF-CAM-JUNCTION |
SRF-CAM-CEILING |
|
|
|
|
|
||
|
SRF-CAM-CORNER |
SRF-CAM-POLE |
SRF-CAM-FLUSH |


