SAFR Milestone Operation Guide
- SAFR Milestone Preferences
- Connect Cameras to Milestone
- Create Overlay Metadata Driver on Milestone Server for each Camera
- Associate the Milestone Integration Platform (MIP) Device with the Camera
- Connect SAFR to Milestone Video Feeds
- Automatic Bookmarks
- SAFR Identities
- SAFR Events
- SAFR Overlays
- SAFR Operator Modes
- Alarms and Notifications
- Troubleshooting Tips
- See Also
Integrated SAFR Milestone is only available on Windows.
Integrating SAFR's facial recognition and analysis capabilities into Milestone enables you to use SAFR's video feed information overlays within Milestone camera video feeds, thus making it much easier to quickly and accurately separate unknown people from authorized people from known threats. You'll also have immediate access to additional infomation such as age, gender, sentiment, name, company, known associates, or any other configurable information you want to create.
Integrating the two systems also allows SAFR's information about individuals to trigger Milestone alerts and other actions within the Milestone system. Milestone's metadata within bookmarks are enriched with SAFR's additional information, allowing you to more easily find relevant bookmarks.
The SAFR Milestone Integration Guide page discusses how to install and configure SAFR and Milestone so that the two systems are properly integrated. This page discusses how to operate the integrated systems.
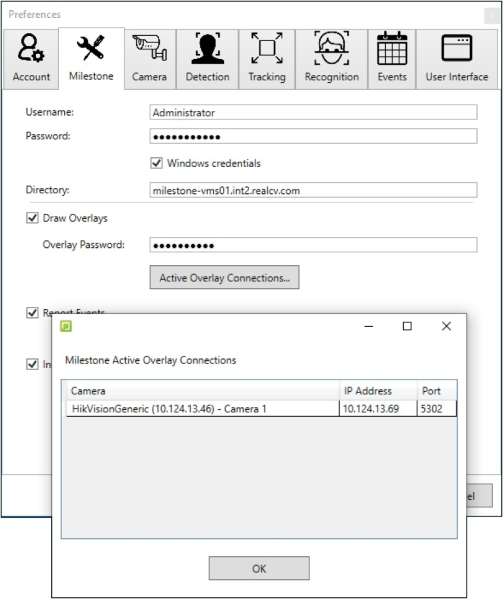
SAFR Milestone Preferences
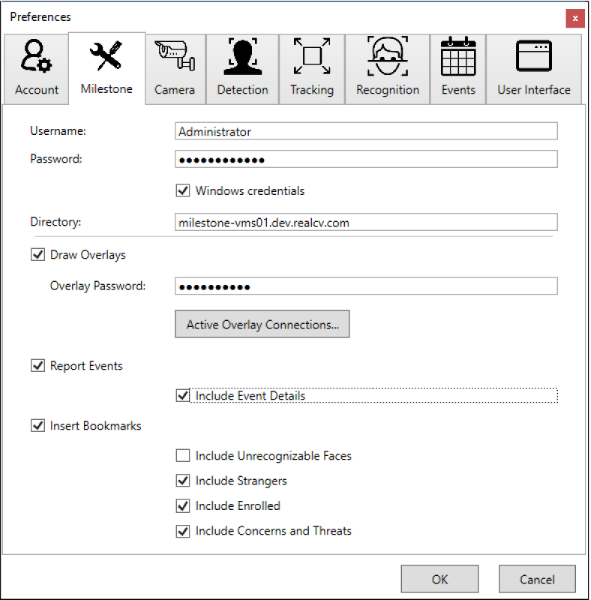
- Username: Name of the user with the necessary permissions to connect SAFR to Milestone.
- Password: Password of the user with the necessary permissions to connect SAFR to Milestone.
- Windows credentials: Indicates whether the user is a Windows user or a basic user.
- Directory: IP address or hostname of a Milestone server.
- Draw Overlays: Enables the use of SAFR overlays on Milestone cameras.
- Overlay Password: This is the password that should be configured/used in Milestone to access SAFR to receive overlay data. See the Interpret Video Feed Overlays page for information about SAFR overlays. After you add the overlay password, you need to restart the Milestone XProtect Smart Client and the SAFR Desktop Client.
- Report Events: Enable to allow the reporting of SAFR events to Milestone. Note that only events reported to the SAFR Events server are reported to Milestone.
- Include Event Details: Increases the verbosity of events in attaching JSON to the event that includes all of the technical details of the event. This is useful if an operator is using macros to handle the event for decision-making.
- Insert Bookmarks: Adds bookmarks to the video stream related to events. Allows operators to search video for events or recognized person names. Use caution when deciding what to include since many faces can cause many bookmarks to be created.
- Include Unrecognizable Faces: When enabled, adds bookmarks when a face is detected but SAFR does not have enough information to determine if they are a stranger or a known person. This can result in an overwhelming number of bookmarks, so it's disabled by default. However, this setting can be useful when monitoring areas with very few people.
- Include Strangers: When enabled, adds bookmarks when a face is recognized and determined to be a stranger. This option is generally useful for secured areas where only known people should be.
- Include Enrolled: When enabled, adds bookmarks when a face is recognized and determined to be a known person.
- Include Concerns and Threats: When enabled, adds bookmarks when a face is recognized and determined to be a known concern or threat.
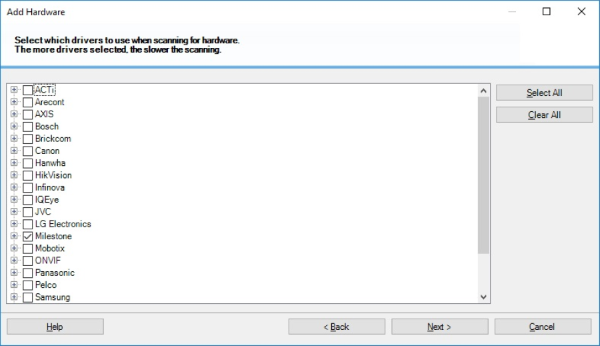
Connect Cameras to Milestone
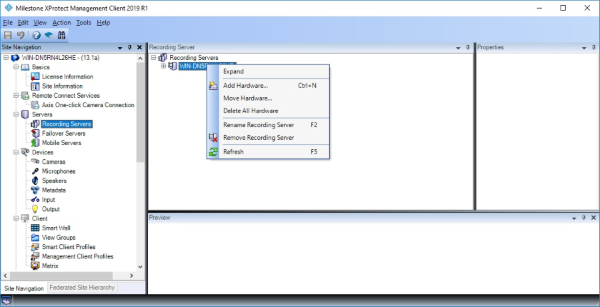
It is very likely that cameras are already connected to the Milestone server but if additional cameras are to be added use the Milestone Management client. The best information on how to do this is in the Milestone XProtect Administration Guide. However, what follows is a brief explanation of the procedure:
- Open the Administration client.
- Go to Recording Servers.
- Right-click the Recording Server to which you want to add a camera.
- Select Add Hardware.
- Select a method to auto-discover the camera. For this example, use auto-discover.
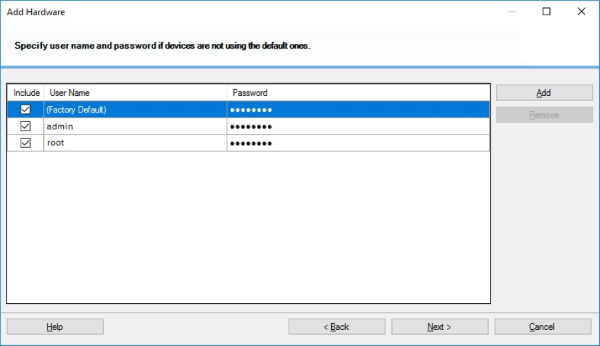
- Enter the username and password for the camera.
- Check the box next to each manufacturer of the cameras you want to add. Click Next.
- Add any username and password combination used to connect to the camera.
- Cameras appear in the list as they are discovered. Check the box next to each camera you want to add.
- The hardware for each camera is listed. Check the box for each part to be added. Types of parts are camera feeds, microphones, speakers, and others.
- Hardware parts need to be added to groups. At the left, select the default group for each type of hardware. At the right, you can override the group for individual hardware parts.
- Click Finish to add the selected hardware.
Note: The XProtect Smart Client has to be restarted to pick up newly added cameras.
Create Overlay Metadata Driver on Milestone Server for each Camera
- Open the Milestone XProtect Management Client. In the left pane, under Servers, click Recording Servers.
- In the center pane, right-click the appropriate server name, and click Add Hardware.
- In the dialog, click the Manual option, and click Next.
- If not already in the list, click Add to include the password from the SAFR > Preferences > Milestone tab Overlay Password field. Include a username of your choice. (e.g. SAFR)
- If you make changes to the overlay password on the SAFR > Milestone tab, make sure that you click OK at the bottom of the window. Then make sure the password on the Add Hardware username/password page includes the changed password. If not, the add hardware operation will fail.
- After you have edited the username and password table, click Next.
- Click Clear All, select Milestone only, and click Next.
- Add the IP address and port number of the SAFR client active overlay connections. To find this information, go to SAFR > Properties > Milestone tab, and click Active Overlay Connections. The dialog provides a table of camera names, IP addresses, and port numbers. Please note the IP address of the SAFR Desktop Client and not the IP address of the camera itself.
- The password in the Overlay Password field must be included in the Add Hardware username/password table or the add hardware operation will fail.
- The password in the Overlay Password field must be included in the Add Hardware username/password table or the add hardware operation will fail.
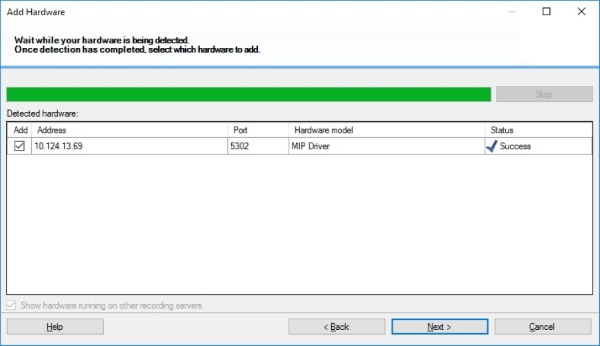
- From the Hardware Model menu, select MIP Driver. Click Add to create more rows for additional MIP driver addresses and ports if needed. Click Next.

- On connection success, click Next.
- Select the Metadata check box. We recommended that you click the Name field for the MIP driver (Metadata Port 1) and rename it to include the name of the camera to assist you when associating the camera with the MIP driver later. Click Next to add the hardware.

- From the Add to Group menu, associate the MIP driver with a specific metadata group to make it easier to locate. Click Finish.
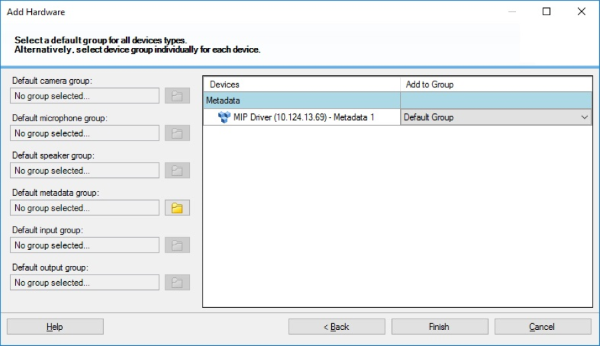
- If the menu does not include a choice, or if you receive an Assign Device to a Device Group message, do the following:
- In the list in the left pane, to the right of the Default Metadata Group field, click the folder icon.
- In the Select Group dialog, in the lower-left corner, click the folder-plus icon to add a group.
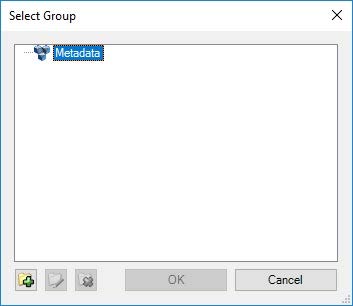
- Provide a name for the device group, and click OK.

- From the Add to Group menu, you can now select the new device group.
- After the driver has an associated device group, click Finish.
Associate the Milestone Integration Platform (MIP) Device with the Camera
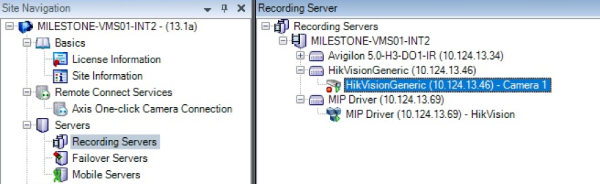
- In the Milestone XProtect Management Client, in the left pane, click Recording Servers and expand the tree view to display the cameras and MIP drivers.
- With the camera highlighted, in the right-pane, at the bottom of the window, click Client.
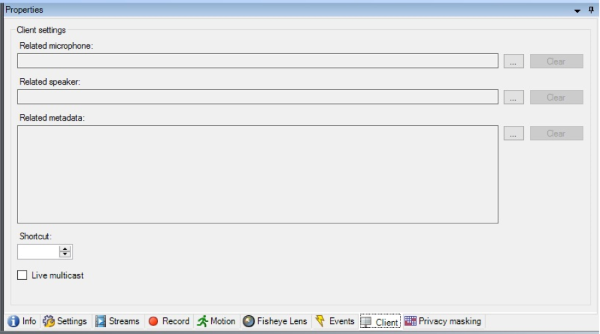
- Under Client Settings > Related Metadata, click the
 button.
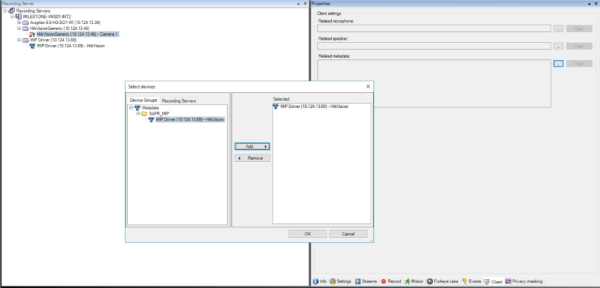
- In the Select Devices dialog, on the Device Groups tab, click to highlight the MIP device you renamed earlier for easy identification. Click Add so that the device appears in the Selected pane. Click OK.
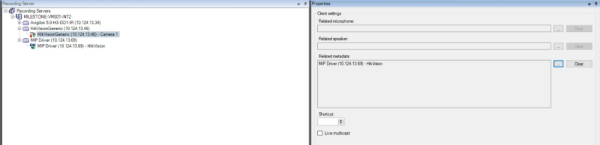
- Click Save to save the changes.
In the right Related Metadata field, the MIP device name is displayed and is now associated with the highlighted camera in the left pane.
Connect SAFR to Milestone Video Feeds
Once the camera is in the Video Archiver, it shows up as a Milestone camera in SAFR. If it does not, try closing and re-opening SAFR.
To get the SAFR enhancements to show up on the Milestone camera feed:
- Open the SAFR Desktop Client.
- Select the Milestone version of the camera (It has Milestone as the first part of the camera name.) from the menu in the main window (upper left).
On successful connection to the Milestone camera, video from the camera plays in the SAFR Desktop Client window.
If overlays have been configured, you can see the enhancements by watching the camera's video feed in XProtect:
- Open XProtect.
- Go to the Live tab.
- Drag and drop a camera from the left side into one of the tiles in the middle.
The camera feed should start up and show the same overlays that are in SAFR (for example, ovals, names).
To connect to additional cameras:
- Open another instance of the SAFR Desktop Client by selecting New from the File menu.
- Repeat the previous steps to connect to a different Milestone camera feed.
On successful connection to the Milestone camera, video from the camera plays in the SAFR Desktop Client window. - Repeat this process for as many video feeds as desired (up to the capacity of the machine SAFR is installed on).
- If more capacity is needed, install SAFR on additional machines and repeat the setup process.
Note: By default, the SAFR Desktop Client for Milestone operates in Enrolled Monitoring video processing mode and generates events and bookmarks into the Milestone system for every enrolled person. If a different mode is desired for a selected camera, choose a different mode from the video window mode selector menu.
Automatic Bookmarks
Milestone creates bookmarks to help locate important events. Bookmarks are populated with person type, ID class, and name. They can also provide more detailed information with even more search attributes, such as age and gender.
The following illustration shows how bookmarks can be used to review important events, such as the detection of a stranger tailgating behind a registered user.
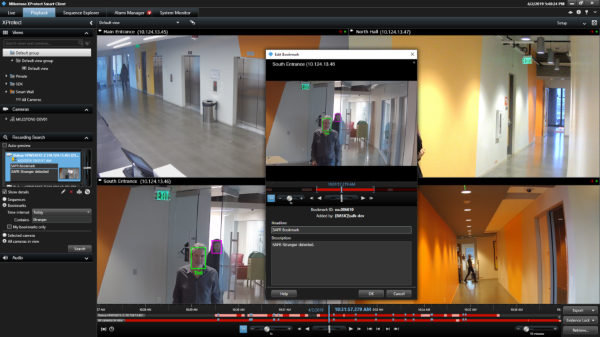
Note: The purple indicator identifies the person is a stranger.
SAFR Identities
To add people through the SAFR Desktop Client from an image or video file, do the following:
- Open the Desktop Client.
- Click File > Import Faces.
- Select the image.
- For an image, each recognized face is enclosed by a box, and you have the option to type a name.
- For a video, each recognized person is learned automatically as long as the faces meet the minimum criteria for recognition.
- If faces are not learned, check the settings in the Detection and Recognition tabs under Preferences to ensure faces meet minimum criteria.
- Detection > Minimum searched face size
- Recognition > To allow identification
Users added to SAFR are not synchronized to Milestone. These users exist only in SAFR.
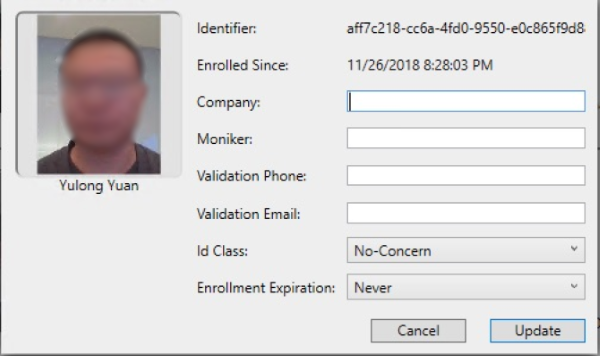
It may be desirable to edit people properties to control which events get triggered when that person is recognized. For example, setting a person's ID Class to Concern or Threat triggers the respective alarms. The most important people attributes are Name, Image, Person Type, and ID Class.
The Name, Image, and Person Type should be edited through SAFR. Person Type defines a person's role (e.g. staff or visitor), while the ID Class defines the risk level (No-Concern, Concern, or Threat). Person Type and Image can be edited in the Desktop Client by changing the Person Type on the People screen.
ID Class and all other attributes of a person are also edited within SAFR People dialog, accessed through the SAFR Desktop Client Tools menu. All identities are created by default with an ID Class of No Concern. To edit a person's ID Class, open the People window from the SAFR Desktop Client Tools menu as follows:
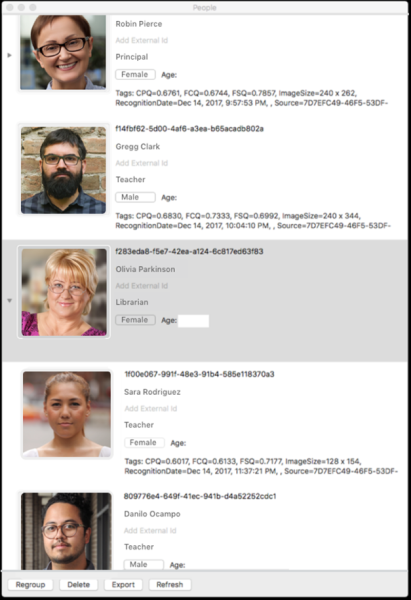
The Person Type and Name can be edited by clicking the respective fields on the People screen. To edit ID Class, double-click the person and choose the desired value from the ID Class menu in the People Edit dialog as shown in the following illustration:
SAFR Events
You can use SAFR to generate events. When enabled on the Events Preferences page, events occur when a person appears in the view of a connected camera. When a person appears in the camera's view, they're immediately assigned an ID Class attribute, although that ID Class may change if the system successfully recognizes them and assigns them a more appropriate ID Class. The types of ID Classes are listed below.
- Unrecognizable: A face was detected but it wasn't of sufficient quality to attempt recognition.
- Stranger: The person's face is of sufficient quality to recognize them, but they're not registered in SAFR's Identity Database.
- No-Concern: Registered person.
- Concern: Registered person who has been marked as a person of concern.
- Threat: Registered person who has been marked as a known threat.
The following table lists the available events that SAFR makes available to Milestone.
| Event Message | Id Class | Named | Person Type | Condition | People Attributes |
|---|---|---|---|---|---|
| Unrecognizable face detected | N/A | N/A | N/A | Face detected but insufficient information for recognition | idClass="unidentified" |
| Stranger detected | Stranger | N/A | N/A | Face detected but not found in registered people | idClass="stranger" |
| Registered person detected without name | Normal | No | None | Registered person without name or person type assigned | idClass="noconcern" && personType="" && name="" |
| Registered person detected with name <name> | Normal | Yes | None | Registered person with name but no person type | idClass="noconcern" && personType="" && name=<name> |
| Registered person detected of type <personType> | Normal | No | Defined | Registered person with person type but no name | idClass="noconcern" && personType=<personType> && name="" |
| Registered person detected of type <personType> with name <name> | Normal | Yes | Defined | Registered person with person type and name | idClass="noconcern" && personType=<personType> && name=<name> |
| Concern person detected without a name | Concern | No | None | Same as above for Concern | idClass="concern" && personType="" && name="" |
| Concern person detected with name <name> | Concern | Yes | None | Same as above for Concern | idClass="concern" && personType="" && name=<name> |
| Concern person detected of type <personType> | Concern | No | Defined | Same as above for Concern | idClass="concern" && personType=<personType> && name="" |
| Concern person detected of type <personType> with name <name> | Concern | Yes | Defined | Same as above for Concern | idClass="concern" && personType=<personType> && name=<name> |
| Threat person detected without a name | Threat | No | None | Same as above for Threat | idClass="threat" && personType="" && name="" |
| Threat person detected with name <name> | Threat | Yes | None | Same as above for Threat | idClass="threat" && personType="" && name=<name> |
| Threat person detected of type <personType> | Threat | No | Defined | Same as above for Threat | idClass="threat" && personType=<personType> && name="" |
| Threat person detected of type <personType> with name <name> | Threat | Yes | Defined | Same as above for Threat | idClass="threat" && personType=<personType> && name=<name> |
SAFR Overlays
SAFR for Milestone enhances video monitoring by providing overlays that gives the security personnel more information, including person types, threat classification, and name. It can even be used to augment the video views with age and gender information that may be useful in reporting suspects.
The following illustration shows how overlays give more information about the subjects in view:
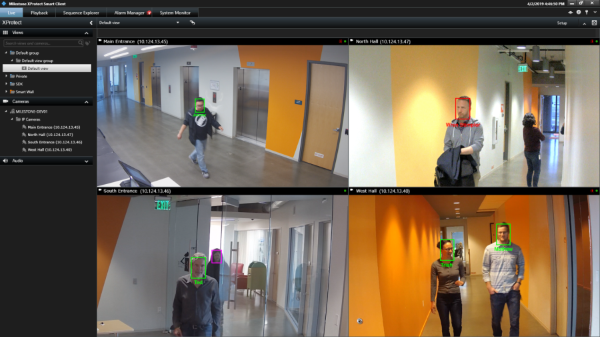
The person in the top left is a stranger, the person in the top right is a recognized person with low probability, and the person in the bottom left is a known threat. The information is conveyed by the color of their overlays. The following list describes the default colors used in SAFR overlays:
- Gray: Unrecognizable. A face was detected but it wasn't of sufficient quality to attempt recognition.
- Purple: Stranger. The person has been recognized, but they're not in Genetec's cardholder database nor in SAFR's Person Directory.
- Blue: Registered person without a name. The face was recognized as matching one already in the database.
- Green: Registered person with a name.
- Yellow: Concern. The registered face has been tagged as a concern.
- Red: Threat. The registered face has been tagged as a threat.
SAFR Operator Modes
SAFR has different operator modes that control what events are generated. Below is a short summary of the modes most relevant to Milestone XProtect integration. For a complete description, see the Operator Modes documentation.
- Secure Access: Trigger events only for cardholders (or persons registered directly in SAFR) only when there is a high confidence match. Useful for secure entry. (e.g. unlocking doors)
- Secure Access with Smile: Same as Secure Access but includes an additional trigger event if the subject smiles.
- Enrolled Monitoring: Trigger events for cardholders (or persons registered directly in SAFR) but with lower confidence.
- Enrolled and Stranger Monitoring: Same as Enrolled Monitoring but triggers events for strangers also.
Alarms and Notifications
You can also use SAFR to view recognition events. Recognition events occur when a known, unknown, or unrecognized person appears in the view of a camera. The types of recognized persons are:
- Unrecognizable: A face was detected but it wasn't of sufficient quality to attempt recognition.
- Stranger.
- Registered person without a name.
- Registered person with a name.
- Registered person marked as a Concern.
- Registered person marked as a Threat.
There are several combinations of these conditions that can be triggered. The following shows multiple events populated in the Milestone alerts panel:
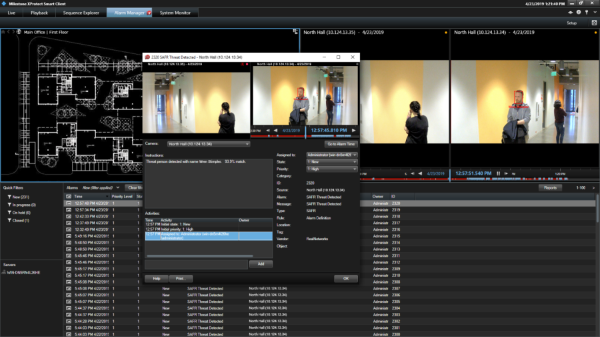
Note: Clicking any of the events on this screen allows the video from that event to be replayed.
Troubleshooting Tips
Note: When closing SAFR, use the Quit SAFR option on the File menu. Closing SAFR using the Window Close button will cause you to lose the SAFR state settings and connected cameras for that window.
- If detection or recognition results in not many faces found or recognized, check that the Milestone video feeds are of a sufficiently large frame size.
- If events are not being triggered, ensure the correct SAFR video processing mode is selected.
- If overlays are not displayed after configuration, the issue may involve a Windows Defender firewall security alert either before or after your system has been rebooted. The result is that the SAFR application is blocked. Configure Windows Defender Firewall Inbound Rules to enable SAFR and Client.