1 Installation and Configuration
1.1 Introduction
Deploying and configuring SAFR and AMAG Symmetry will allow SAFR to import AMAG person records and credentials to be used on SAFR SCAN face authentication readers. SAFR SCAN is using the imported face image, converted into a biometric signature, to verify a person identity when presented at a SAFR SCAN reader. When a person’s identity has been verified the SAFR SCAN reader transmits the imported Access Credentials to the access control panel via Wiegand or OSDP signaling.
Please note that SAFR will not import a person record if it does not have a card access credential. Likewise, if the access credential is removed from the person record, SAFR will delete the person record in SAFR. SAFR only supports one card access credential per person record. If multiple credentials exist, the most recently updated credential is imported.
For complete SAFR and SAFR SCAN documentation please visit http://docs.real.com.
1.2 Integration Overview and Requirements
Integrated SAFR - AMAG Symmetry is available on Windows and Linux.
This guide specifically describes:
- Configure Symmetry to allow SAFR server to import People and Access Credentials from Symmetry.
- Configure the External Identification Synchronization in SAFR server.
A typical integration architecture:

Please note that this Guide does not include the Installation of the SAFR Server (SAFR Platform) or the AMAG with Symmetry.
1.2.1 System Requirement
Symmetry has the following system requirements:
-
AMAG Symmetry Version 9.3 to 9.8
⚠️ Consult SAFR support before upgrading AMAG Symmetry beyond supported versions. - AMAG Symmetry DataConnect license
- Networking Port for MSSQL Server (1433 by default) open from SAFR Server to MSSQL Server.
SAFR has the following system requirements:
- SAFR Platform Version 3.27 or later
-
Each machine running the SAFR Server must meet the following requirements:
- Windows 10, Windows Server 2016 or later
- i5 or Xeon Silver 4216 or faster with at least 4 cores allocated to SAFR Computer
- 16 GB System RAM
- 1 TB Storage
- For systems running more than 50 SAFR SCAN, please consult SAFR Technical Support at support@safr.com or http://support.safr.com
1.2.2 Attribute mapping between AMAG and SAFR
The following is the current imported and supported attributes/field from Symmetry
|
AMAG |
SAFR (People data record) |
Notes |
|
First Name |
First Name |
|
|
Last Name |
Last Name |
|
|
n/a |
Person Type (default “none”) |
SAFR defaults all Person Type records to “None”. |
|
Picture |
Picture |
If no picture in person record, import only name and credentials for use with card only access. |
|
PIN |
PIN |
|
|
Card Format |
Access Card Format |
|
|
Facility code |
Access Card Facility ID |
|
|
Card Number |
Access Card ID |
|
|
Active Date |
Access Activation |
Record not added until Active Date is reached. |
|
Inactive Date |
Access Expiration |
SAFR Expiration set to same if before Inactive Date. If after Inactive date, record not added. |
One card is imported for each card assigned to a card holder. Each card is stored in the same SAFR person record.
1.3 Symmetry Configuration
SAFR integration to AMAG requires the AMAG Data Connect module which requires license from AMAG. It is also required to setup DataConnect Export and create a user with permissions to export data. These are described below.
No additional license or software is required on the SAFR server.
1.3.1 AMAG Module Licensing
The Data Connect modules must be installed on AMAG with an accompanying AMAG license. Follow the following for the Data Connect .
- Log in to Symmetry as a user with the System Manager role. (There is a default user called Manager; its password is the same as its username but with lower case m.)
- Click the Maintenance tab.
- Under Licensing select System Licenses.
- Click Add.
- Enter the serial number from the license PDF file for the Data Connect module.
One license is applied, you should now see a Data Connect Module License added.
- Log out of Symmetry and back in to apply this change.
1.3.2 Enable Multiple Card Support
Go to Maintenance > System Preferences > Card Settings
Enable the “Mulitple Cards” checkbox as shown.

1.3.3 DataConnect Export Setup
Log in to Symmetry as a user with the System Manager role. (There is a default user called Manager; its password is the same as its username but with lower case m.)
Select Operation, then Data, then Data Export.
Select all items that need to be exported and click OK.
Following are the minimum options required by SAFR:

IMPORTANT: If card holders have multiple cards, make sure to check Multiple Cards > Extended Support as shown.
1.4 SQL Server Configuration
The following tasks are best done using SSMS (SQL Server Management Studio) which is freely downloadable from this link: Download SQL Server Management Studio (SSMS).
After you have installed the management studio, log in using Windows credentials.
1.4.1 Enable SQL Server Authentication
SAFR only supports SQL Server Authentication. If not already enabled, SQL Server as follows.
Open SSMS and right click on the SQL Server entry and select “Properties” as shown below.

Select “Security” page and set Server authentication to “SQL Server and Windows Authentication mode” as shown.

Restart SQL Server in Windows Services Control Panel for this change to take effect.

1.4.2 Add Export SQL User
Account must use SQL Server authentication. Windows Authentication is not supported.
Expand out the Security section, right click on Login, and select New Login… 
Choose and enter a Login Name and Password. Also disable the password policy, expiration, and/or change checkboxes . Please note that the login name entered here will also be the login name that it used when configuring SAFR to connect to AMAG for External Identity Synchronization. 
- Use SQL Server authentication. Windows authentication is not supported.
- Enabling “Enforce password expiration” is allowed but administrator will need to ensure to update password and update SAFR configuration at the required intervals.
Click OK.
Expand “Logins” and open the new user just created.
Select User Mapping, check multiMax and multiMaxExport databases. Then select each database you just added and select db_datareader for both in the “Database role membership” list below. 
Click OK.
1.4.3 Grant Permissions
Expand Databases in Object explorer

Right-click on each database (multiMax and multiMaxExport) and click properties.
Select Permissions and click on the username created in the earlier step. Then scroll to the “Execute” Permission in the “Explicit” list below and click “Grant” as shown: 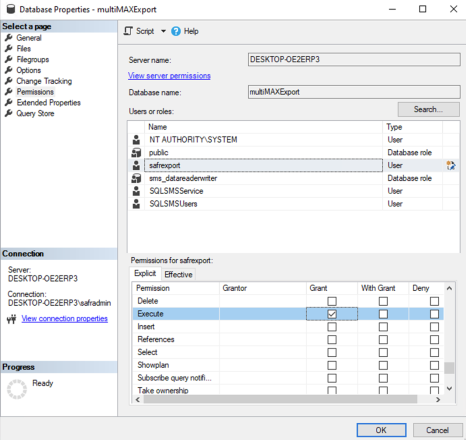
Click Ok
Open properties again for that database and view the “Effective” tab. Ensure at least following effective permissions are present. 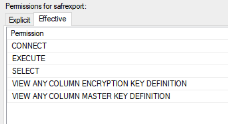
The permission is added from the Explicit tab as described above. Generally, all permissions except EXECUTE are already present.
Repeat Step 8 thru 11 for multiMaxExport database.
Click OK to save changes.
1.4.4 SQL Server Port
SQL Server can be configured for static or dynamic ports. Default is static port on port 1433. Take note of the port SQL Server port for use when connecting SAFR below.
If using dynamic ports, omit the port number from SAFR’s Connection settings and include SQL Server Instance Name in the Host address as shown below in Setup External Identity Synchronization.
See https://learn.microsoft.com/en-us/sql/tools/configuration-manager/tcp-ip-properties-ip-addresses-tab for more information.
1.5 Configuring SSL
AMAG and SAFR must be use the same communication protocol. By default SAFR is configured to use HTTPS and trust the SSL Certificate on the SQL Server which works with most deployments.
SAFR can be configured to handle the following conditions.
- SSL (HTTPS) with SSL CERT issued by trusted CERT Authority
- SSL (HTTPS) with self-signed SSL CERT
- No SSL (HTTP)
1.5.1 Use Self-Signed CERTS
To enable SAFR’s internal trust manager, modify SAFR Configuration and restart SAFR Server as instructed below.
Open a text editor with elevated permissions (“Run as administrator”)
💡Notepad++ is a good text editor for Windows and will automatically elevate permissions when needed.
💡On Linux use sudo to elevate permissions with editor of your choice (e.g. “sudo vi amag.properties”).
-
Open amag.properties file located in following locations (See SAFR Configuration File below)
Windows: C:\Program Files\RealNetworks\SAFR\covi\app\config\covi
Linux: /opt/RealNetworks/SAFR/covi/app/config/covi - Edit the following line
amag.trust.server.certificate:true
- Set value to true to implicitly trust cert (do not validate) AMAG SSL CERT.
- Save amag.properties file
- Restart “SAFR Covi” Windows Service in the Windows Services Control Panel (if on Linux, run ‘stop’ and ‘start’ in the SAFR/bin directory).
1.5.2 Disable SSL CERT Validation
1.5.2.1 Disable SSL CERT Validation in SAFR (use HTTP)
- Open amag.properties as described in steps 1 and 2 of section 1.4.1 above.
- Edit the following line
amag.ssl:auto:disabled
- Set value to ‘disabled’ to disable SSL (use HTTP).
- Save amag.properties file
- Restart “SAFR Covi” Windows Service in the Windows Services Control Panel (if on Linux, run ‘stop’ and ‘start’ in the SAFR/bin directory).
If disabled, SQL Server must be configured to allow HTTP.
1.6 Set up External Identification Synchronization
To set up identity synchronization between SAFR and Symmetry, do the following:
- Open SAFR Software (either SAFR Desktop or SAFR Server Web Console)
-
Open System Configuration page
- SAFR Desktop: Tools menu > System Configuration
- SAFR Server Web Console: Click on “Status” page
- Scroll down Remote Control and Sync Configuration: section
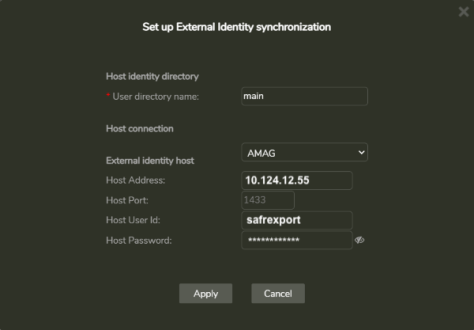
- Enter information for the following fields:
|
User directory name |
The name of your SAFR database name where users and events are stored. Default is ‘main’. |
|
External identity host |
Select AMAG from the drop-down menu. |
|
Host Address |
The IP address or hostname of the AMAG SQL server. If using dynamic ports, SQL Server instance name should also be appended (usually MSSQLSERVER). For example: 10.124.12.55\MSSQLSERVER SAFR does not connect to netbios names. If you have netbios name of AMAG Server, you can get the ip address by executing following in a DOS command window: |
|
Host Port |
The port number that the target AMAG SQL Server is listening on. If using “TCP Dynamic Ports”, leave the field empty (ghost text of 1433 will show but will not be used). See SQL Server Port above for more information. “TCP Port” is be configured in the SQL Server IP Addresses configuration tab. If you know what the current dynamic port is, SAFR will connect to that port until next time it is updated, but this is not recommended because incremental sync will stop working at some point. |
|
Host User Id |
The User Id should be the same Login name created above in section 1.3.3 ”Add Export SQL User”. |
Host Password: The Password should be the password entered above in 1.3.3. “Add Export SQL User”.
- Click the Apply button.
1.7 SAFR Configuration File
External Identity synchronization with AMAG are customized via configuration file. Available properties are documented in amag.properties as described below. To ensure configuration changes are persisted during SAFR upgrades, place any customized properties into the persistent.overrides.properties file.
To view available configuration options along with documentation on their behavior:
-
Go to COVI config directory located in
- C:\Program Files\RealNetworks\SAFR\covi\app\config\covi
- /opt/RealNetworks/SAFR/covi/app/config/covi
- Open ‘amag.properties’
- Review documentation for each property
- Copy desired properties from amag.properties
- Paste the line into persistent.overrides.properties
1.7.1 Card Format Mapping
The card.format.mapping list defined the string that, if matched to an existing SAFR card format (either builtin or custom) will appear in the SAFR person record.
Builtin card formats can be found in the Card Format configuration in the Person settings page (Tools > People > Edit Person > Card Format dropdown) or SAFR SCAN Reader Operation Settings (Tools > Video Feeds > Feed … menu > Operation Settings > Card Format > Card Format dropdown).
Custom Card Formats can be added to the Card Format dropdown by first defining them in Feed Default (Tools > Video Feeds > main … menu > Set Feed Defaults